Assembly instructions
Assembly instructions – 3D animation
DOWNLOAD PDF:
Assembly Instructions for LC Mini Slicer
This small compact LC Mini Slicer – redesign 2019, as well as the previous model of the LC Mini Slicer has no ambition to replace its “sister” LC Slicer – a professional slicer tool.
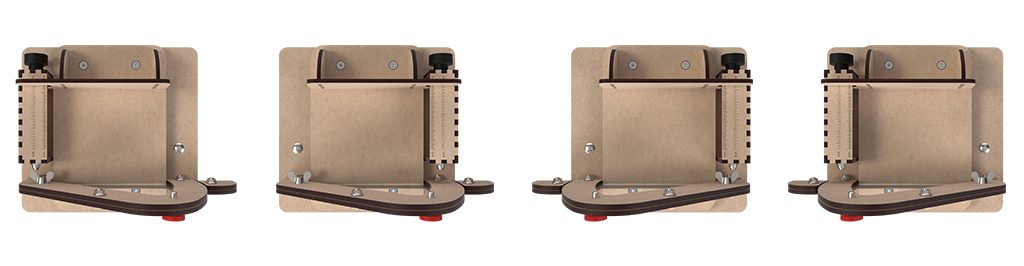
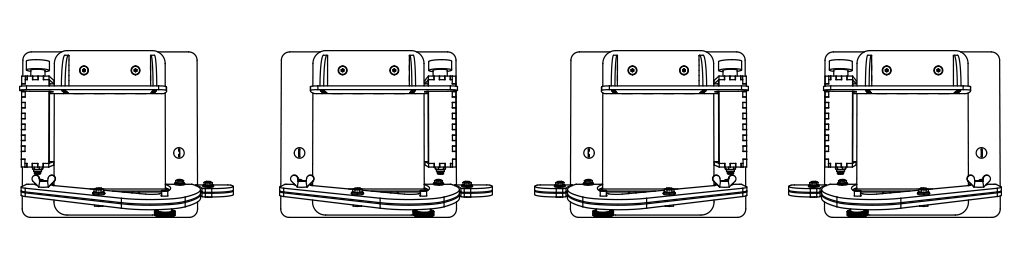
Nevertheless, our intention was to improve handling in the process of slicing and user comfort, primarily the incremental advancement of clay cane up to the Slicing Blade position. With the intention to improve SAFETY we managed to hide the blade in the frame so that it is not visible when not working.
That is why we have borrowed the move of the EASE module from the LC Slicer and have tried to tune it to a perfect design while keeping the manufacturing as simple as possible.
The whole design is created for modern production using a laser, with MDF board and the program data cuts out all parts exactly from the MDF board.
Now it is up to the user to simply assemble the individual parts and glue them where necessary, or join them with a bolt.
For the LC Mini Slicer, we have chosen MDF material, which is strong enough and affordable. By doing so, we manage to keep low manufacturing costs and ensure affordability for end users. In the event of damage to or wear of any part, it is not a problem to ask LC Tools to send a spare part.
We firmly believe that this redesigned tool will become as popular as other tools from the LC Tools professional series and will quickly expand among enthusiasts for polymer clay.
We would appreciate if you sent us images and projects where you work with your LC Mini Slicer. Interesting projects will be shared in Lucy Clay social networks.
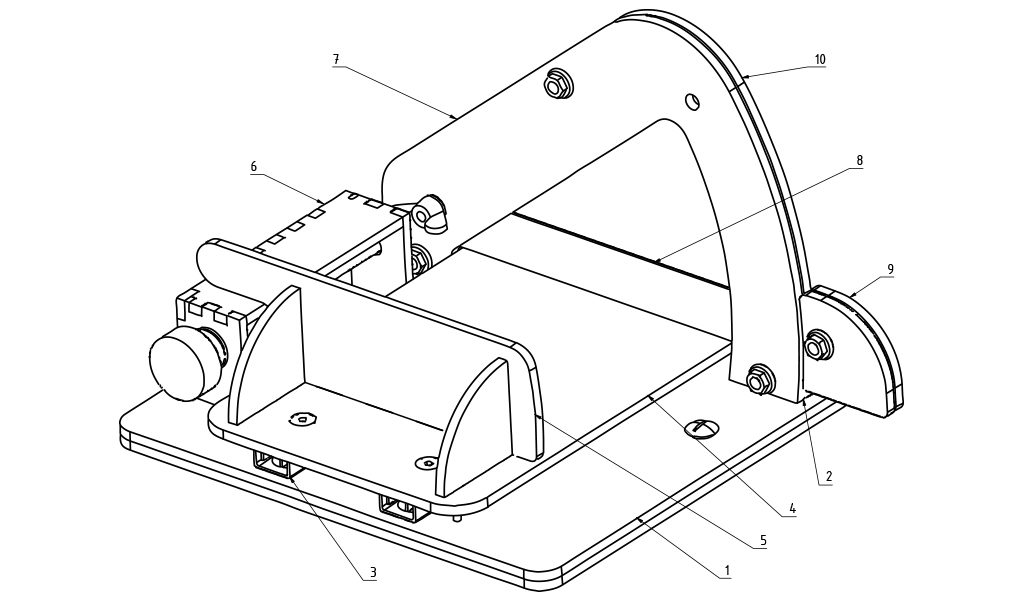
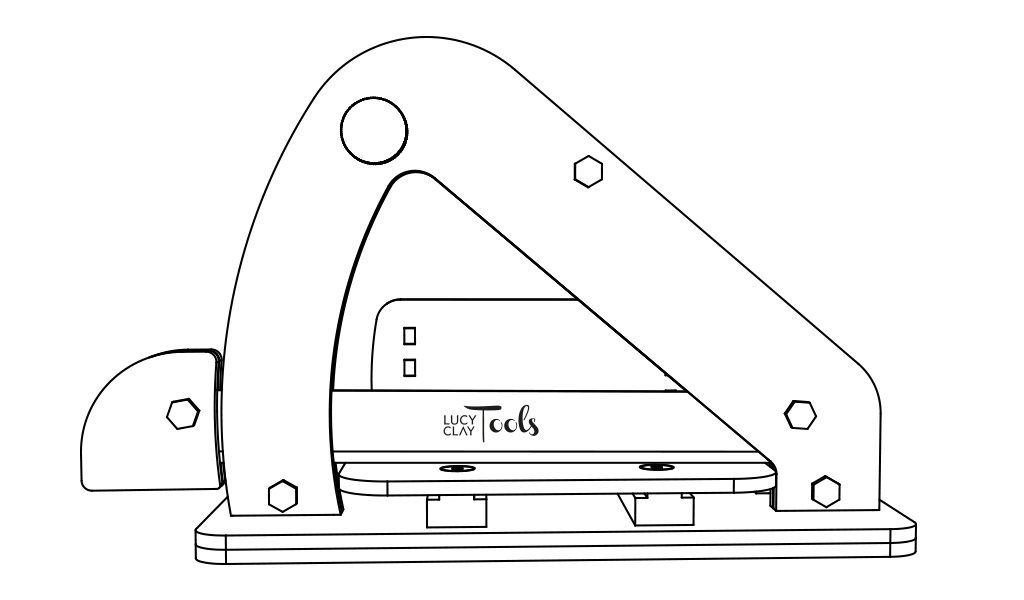
Basic parts of LC Mini Slicer:
- Baseplate
- 2x L Brackets
- 2x Rail Glides
- Slicing Platform
- Backstop Support
- EASE Module with threaded rod
- Double Frame Blade Arch
- Slicer Blade
- Slicer Blade Handle
- SAFETY Knob
- Baseplate Frame
The New LC Minislicer is fabricated from Laser Cut MDF board. In the manufacturing process, Carbon Residue may still be present on the edges of the MDF components in this kit. Cleaning any residue from edges with a wet wipe may be necessary to insure a proper bond in the gluing steps of assembly. The process of laser cutting darkens the MDF board permanently as the laser precisely maps and burns each component. This is not a defect but the nature of the manufacturing process.
The components of your LC Mini Slicer may be personalized or painted if desired.
The LC Mini Slicer can be set up with Left or Right Handed orientation of your preference. Similarly, the EASE Module can be positioned on the left or on the right. To change the position, you can easily turn over the baseplate which moves the gluing holes for the EASE module to the other side.
EASE Definition: The threaded rod with knob and housing block that advances the Slicing Platform forward and backward incrementally.
Once the EASE Module and the back support are glued with adhesive, the left or right-handed position cannot be changed. It is therefore advisable to test the desired position beforehand without gluing, and then you can consider it thoroughly and proceed to carry out the final installation with the adhesive.
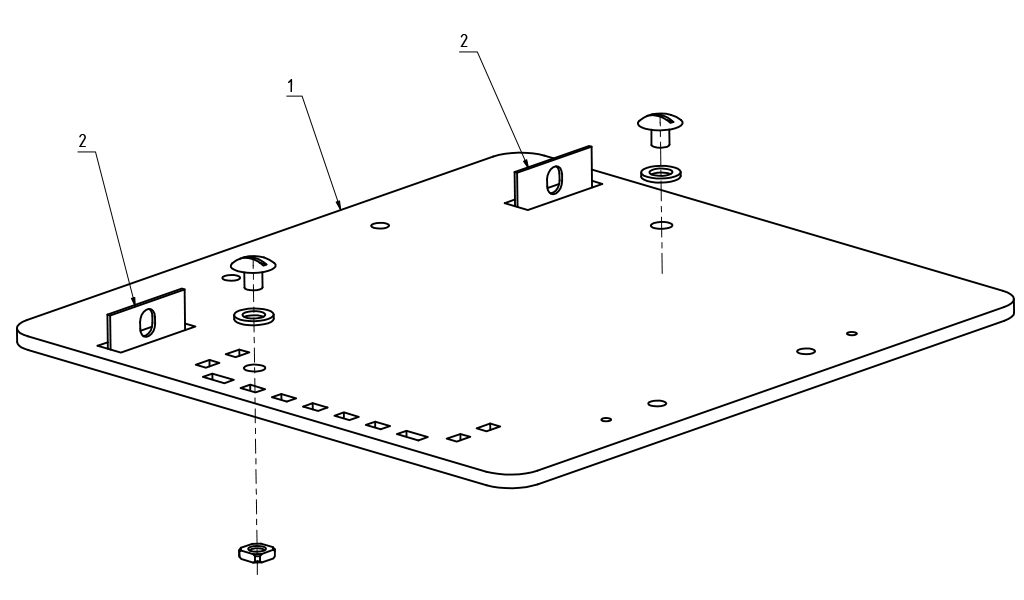
Chassis installation:
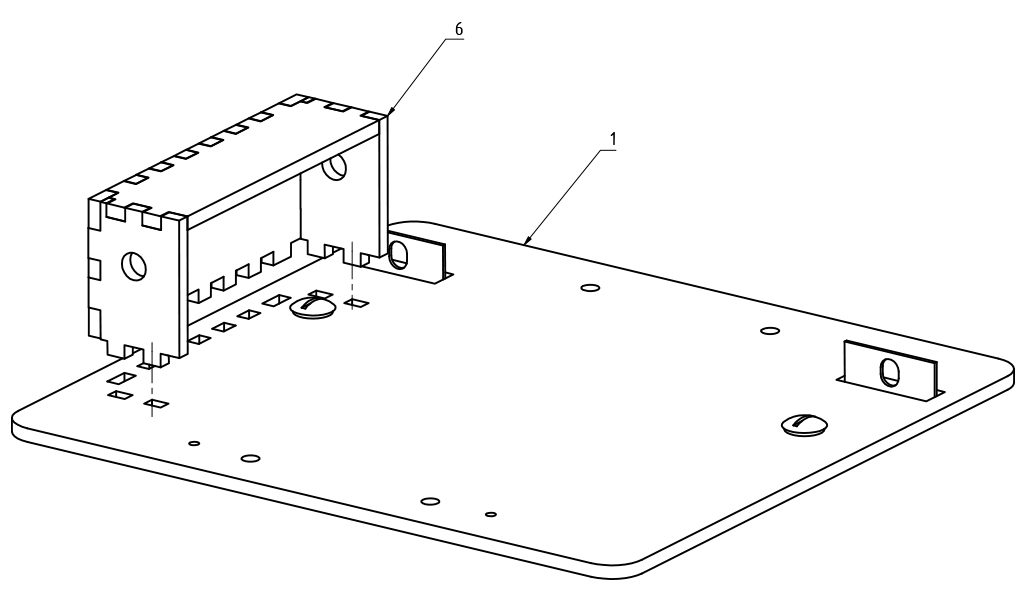
1. 2x – L Brackets are inserted through Base Plates slots and screwed onto the baseplate from the using 2x M5 bolts inserted from the top with 2x washers and secured with 2x square nuts from the bottom.
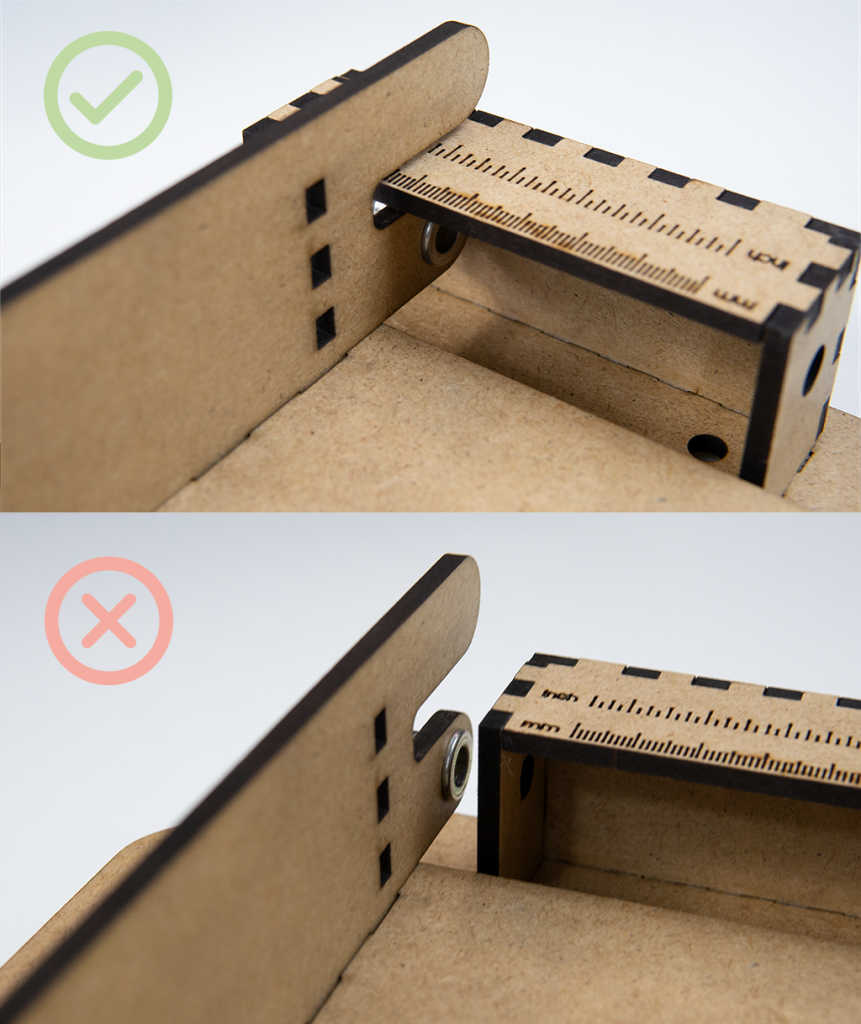
2. The EASE Module – The Ease housing is glued together. CAUTION: The holes on each end for the threaded rod to pass through must be in the correct position, which is at the topmost part of the end panels. Then the EASE housing is glued to the baseplate after left or right-handed orientation is determined by the user.
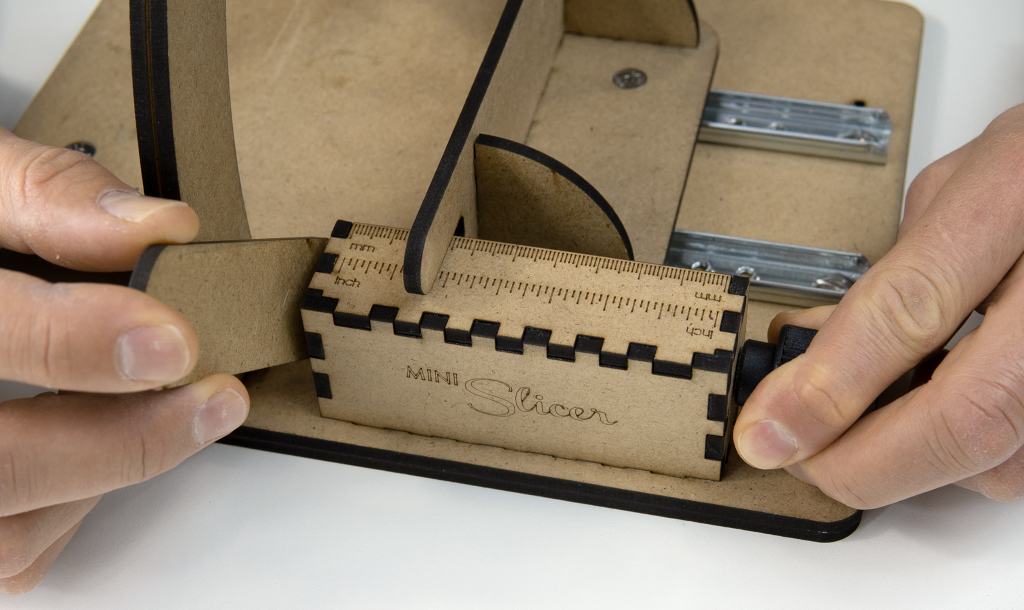
3. The preassembled Slicing Platform and Rail Glides are to be screwed to the baseplate using 4x M5 bolts from the top and a 4x square nuts from the bottom through the ends of each Rail Glide.
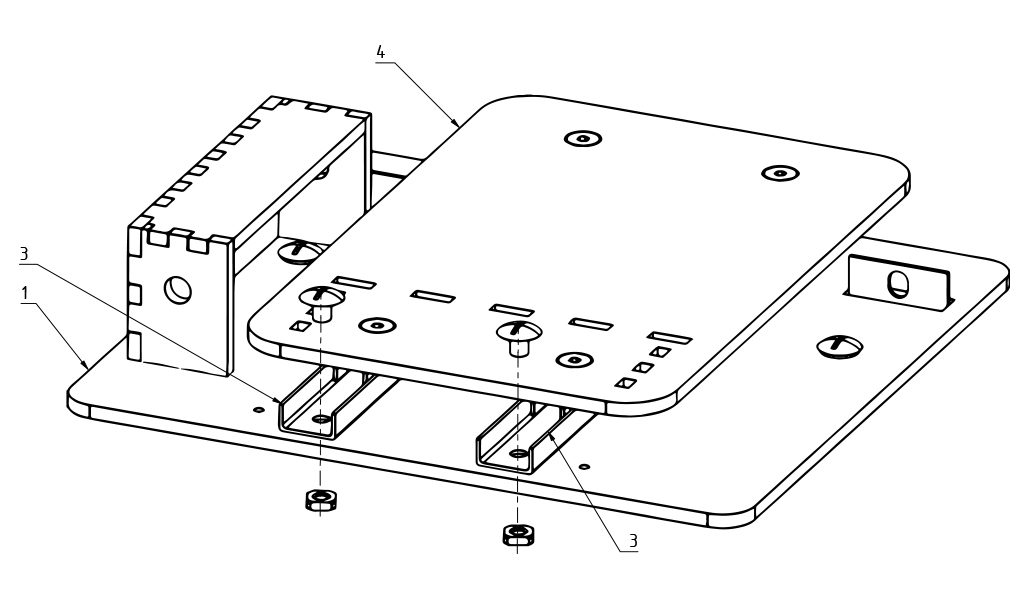
4. For better mounting stability, it is advisable to place the Baseplate on the Baseplate Frame, later in the assembly process the Baseplate and Baseplate Frame will be glued together with the aid of two ALIGNMENT PINS, after the Rails and Slicing platform are attached to the Baseplate.
5. The Backstop Support (with a pressed-in nut for the threaded rod, as supplied by LC Tools) should be glued into the rear slots with the 2 side supports ribs.

6. Prior to gluing Backstop Support, it is advisable to check the threaded rod for free movement through the EASE Module openings. The threaded rod is screwed into the pressed-in nut on the rear support and it should pass through the EASE Module end panels holes without obstruction.
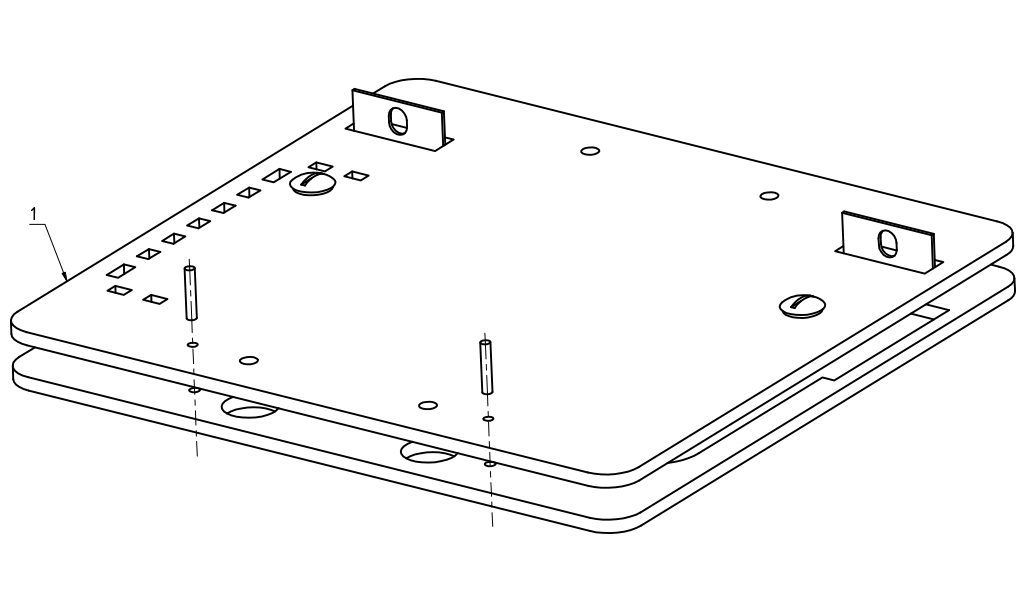
7. Finally, Baseplate Frame should be glued to the bottom side of Baseplate, after being coated with the adhesive and centered using 2x Alignment Pins through two alignment holes at the rear of Baseplate and Baseplate Frame positioned on the outside of each Rail Glide
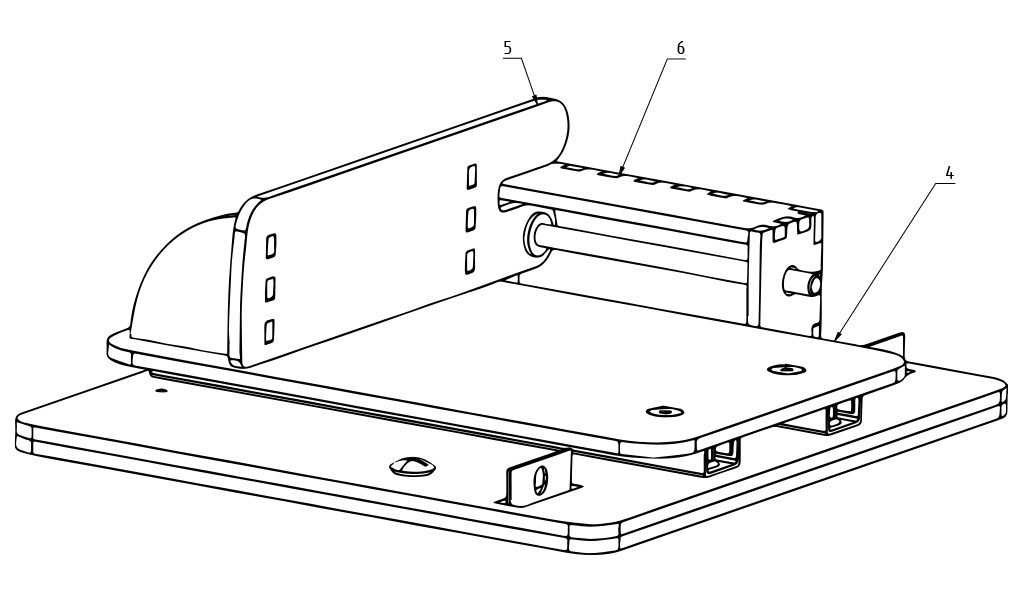
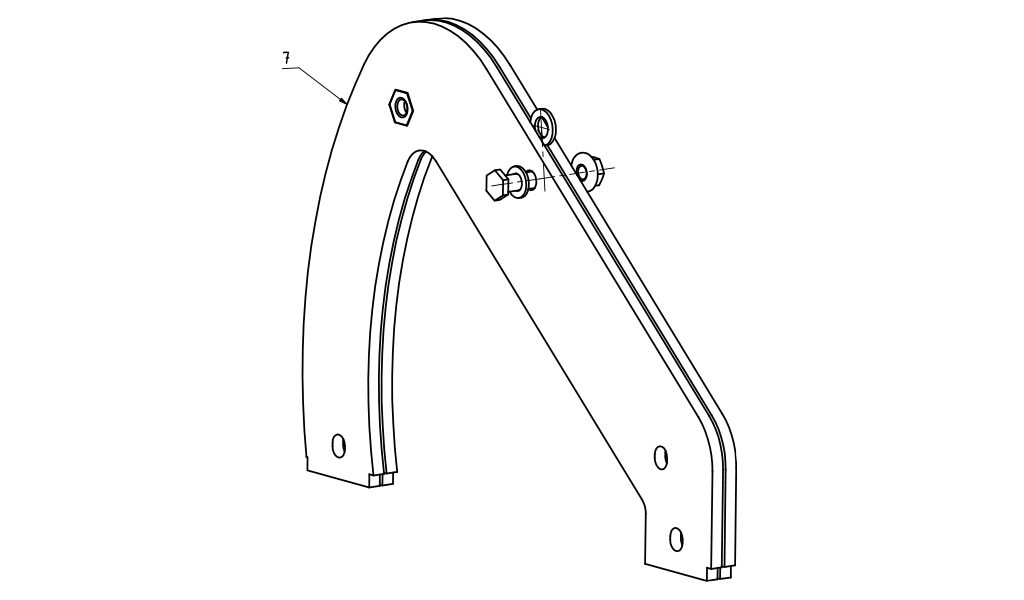
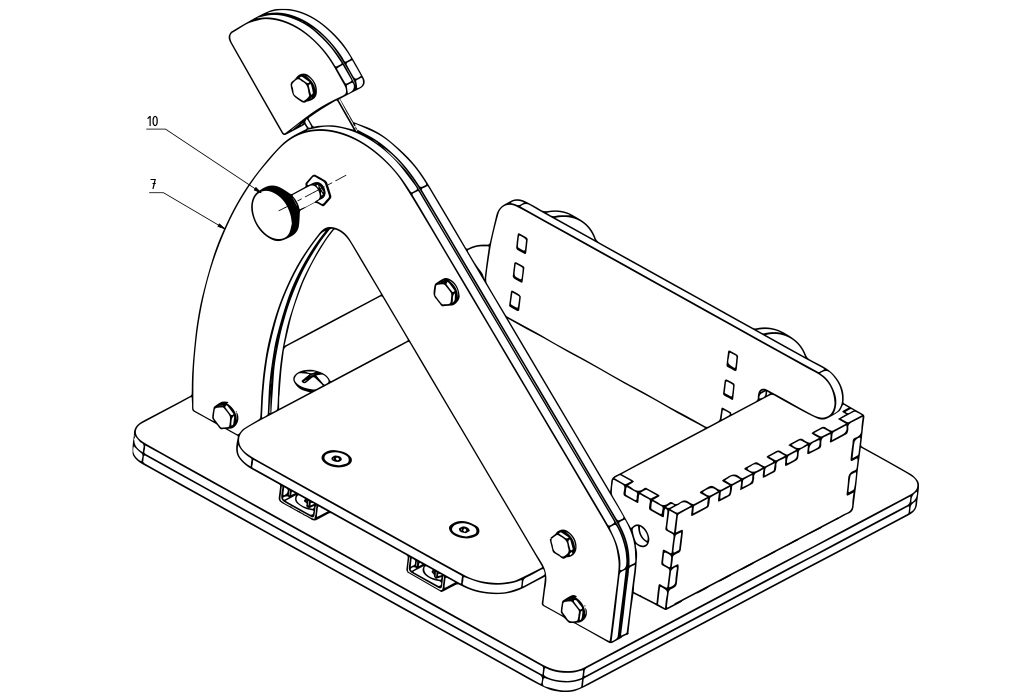
Installation of Double Frame Blade Arch:
1. A SAFETY nut (M6) should be gently tapped into the frame using a hammer on a flat surface. The SAFETY nut is intended for the red SAFETY Knob to be threaded into in a later assembly step.
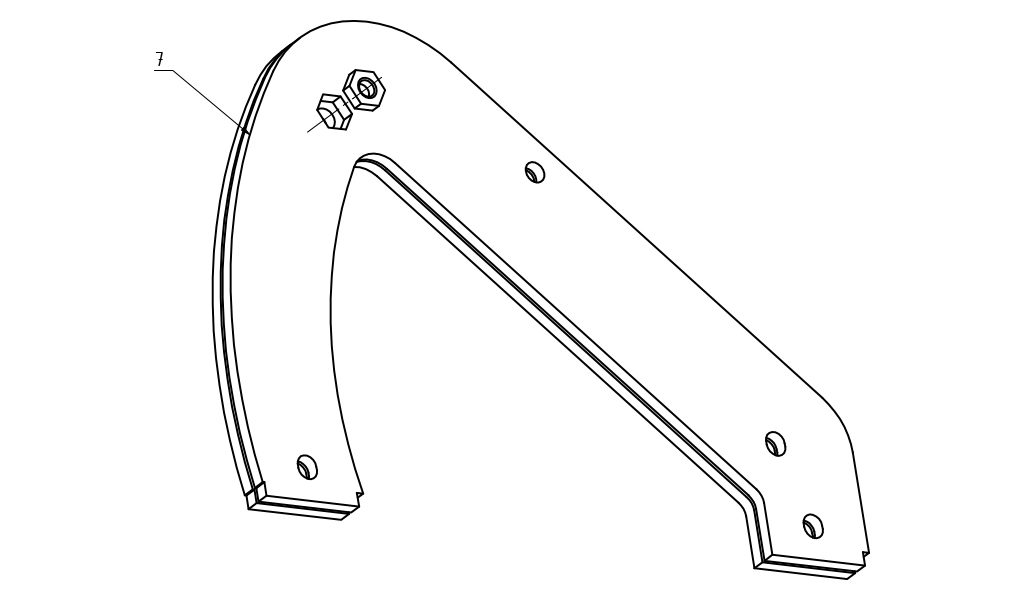
2. The Double Frame Blade Arch should be joined by means of a center M5 bolt with a washer from the front and with a large expansion washer between two frames, the M5 flanged nut should be tightened from behind. Remember to check the choice of left or right handed orientation chosen.
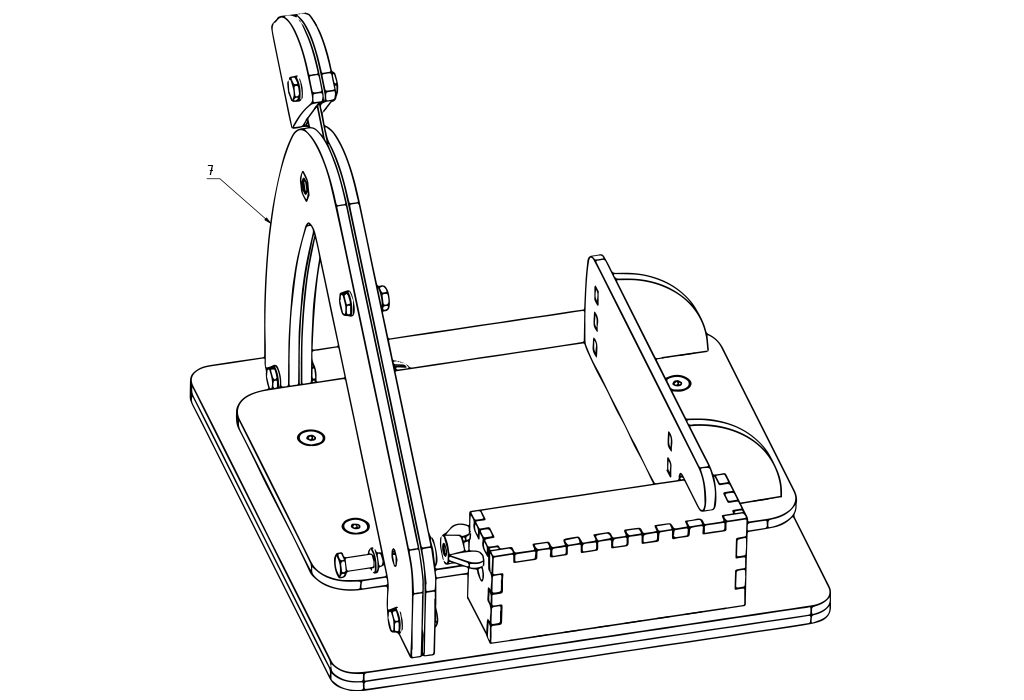
3. Attach the partially secured Double Frame Blade Arch to the protruding L Brackets in the Baseplate at both ends and secured with 2x M5 screws and washers from the front, and 2x flanged M5 nuts tightened from behind.

4. Using caution, screw the Slicer Blade handle onto the appropriate end of the Slicer Blade for your chosen left or right-handed orientation, the halves of the handle are connected by the M5 bolt running through the central opening, with the washer from the front and the M5 flange nut should be tightened from behind. The LC Tools Logo on the Slicer Blade must be visible from the front view!
5. Insert the blade carefully into the space between the two sides for the Double Frame Blade Arch into the hinge point ( the remaining hole opening), tighten it with the M5 bolt and washer from the front and from behind, then tighten the “M5 Wingnut”.
The LC Tools Logo on the Slicer Blade must be visible from the front view!
6. The straight section of the Double Frame Blade Arch is intended as a storage cover to protect hands and the Slicer Blade. Screw the red SAFETY Knob that secures the blade within the Double Frame.
7. With the Slicing Platform advanced forward the blade must be aligned so that it is parallel to the surface plane of the Slicing Platform. It must neither hang below the level nor above the Slicing Platform. Simply adjust the position of the hinge bolt with the wing nut to move the blade upward or downward in the oval hole and tighten when Slicing Blade placement is correct.
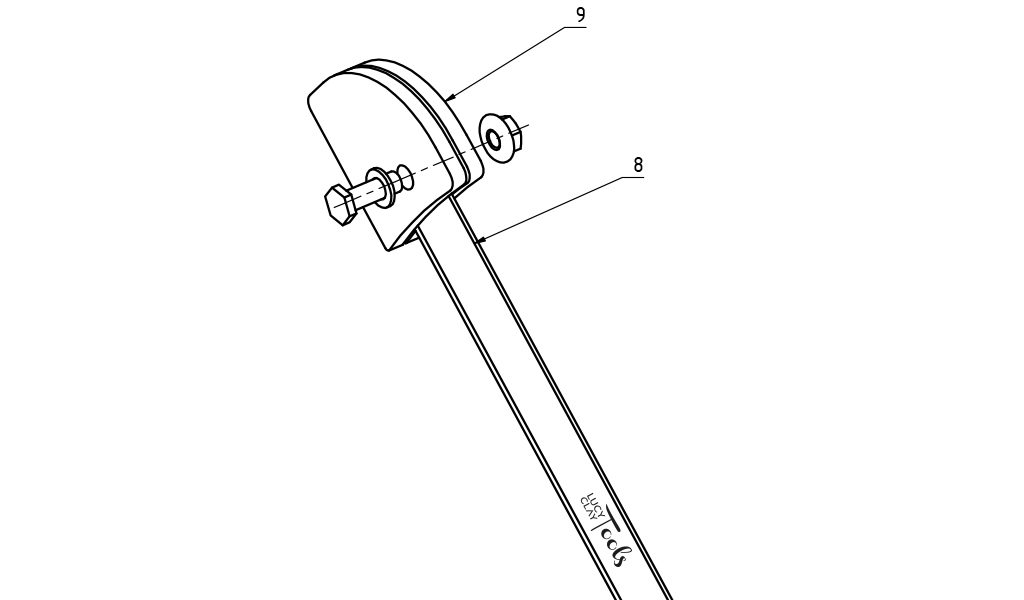
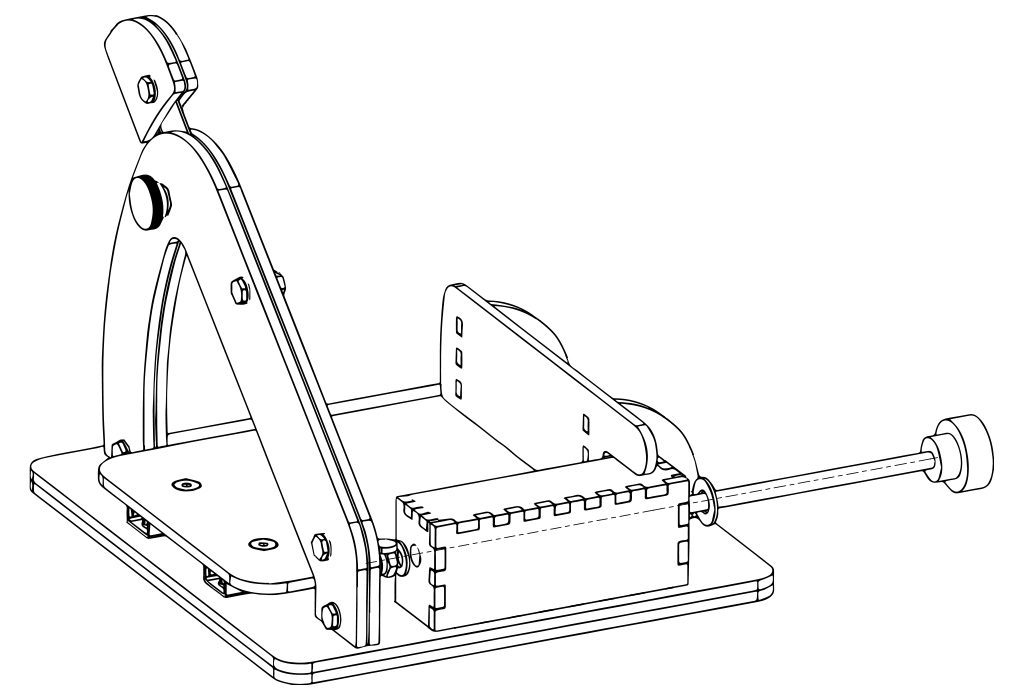
Inserting the threaded rod into the EASE module:
1. The M6 threaded rod with black knob should be inserted into threaded nut at the rear of the EASE Module and then screwed all the way until the end of the threaded rod appears through the hole on the front side of the EASE Module.
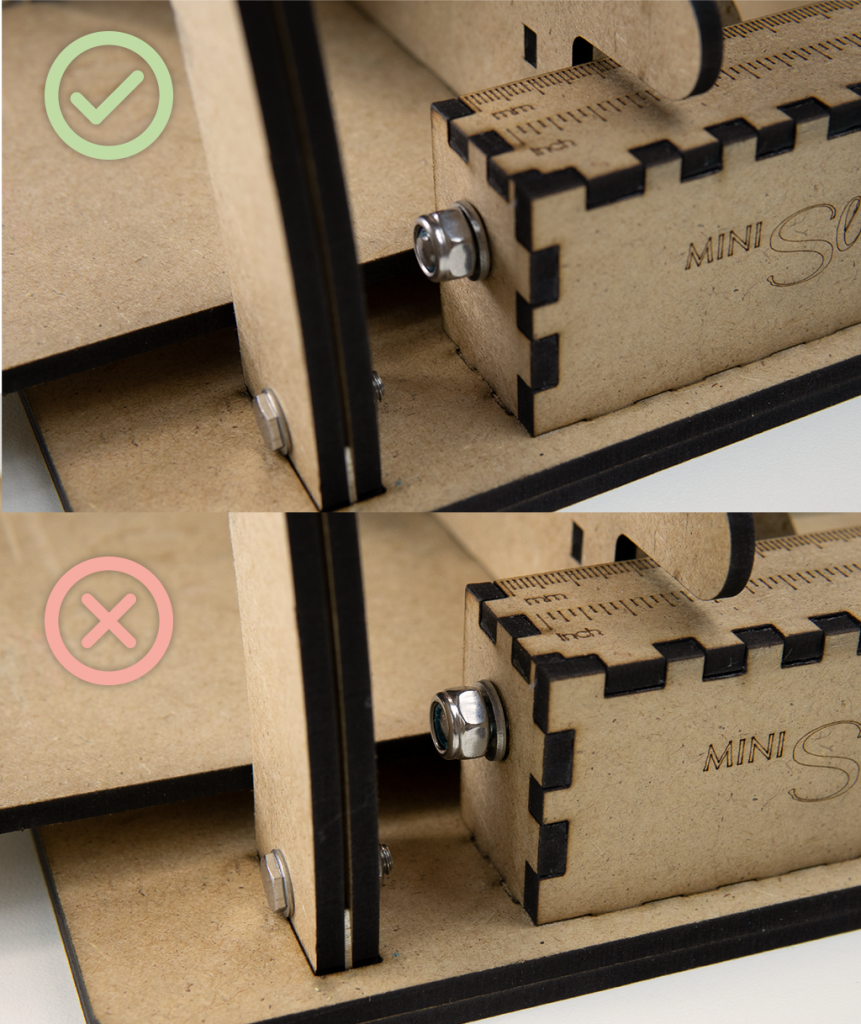
2. When the M6 threaded rod appears at the front hole, a large washer and “nut with o-ring” are fitted and tightened with a wrench so that the threaded rod is practically free of any play but it has to rotate slightly and must be freely movable to advance the Slicing Platform.
All of the Nuts and Bolts should be secure BUT should not be over tightened in order to avoid damaging the surface of MDF board/material.
This is the end of installation.
The Slicing Platform can be fitted with and/or coated with a thin plastic sheet (not included in the pack), up to a thickness of about 1.5 mm, which can display a grid. In that case, the position of the Blade must be adjusted to allow for the added thickness of the sheet.
SAFETY:
- The LC Slicer should only be used for slicing polymer clay.
- Before using the LC Slicer, make sure to place it on a firm horizontal surface/anti-slip mat.
- Once you finish working with the LC Minislicer, make sure to raise the Slicer Blade up into the Double Frame Arch covering and securing Blade with the red SAFETY Knob tightened to secure. This should prevent accidental contact of the Slicer Blade and the hand.
- The LC Mini Slicer is not intended for children and must not be used by children unattended by a responsible adult.
- The Slicer Blade is very sharp and can easily cause a cut or injury. To lift the blade, please use the handle only.
- Keep the blade clean with no residues of polymer clay. When cleaning the Blade, pay special attention and never clean with bare hands or your fingers, use a cloth/wipe instead in a downward motion. Using a tong type tool to hold cloth /wipe is recommended.
- Always follow the safety instructions for protection of yourself and of the others.
- LC Tools Ltd. is not responsible for any injuries or damages resulting from inappropriate handling of LC Slicer.
Contents of packaging:
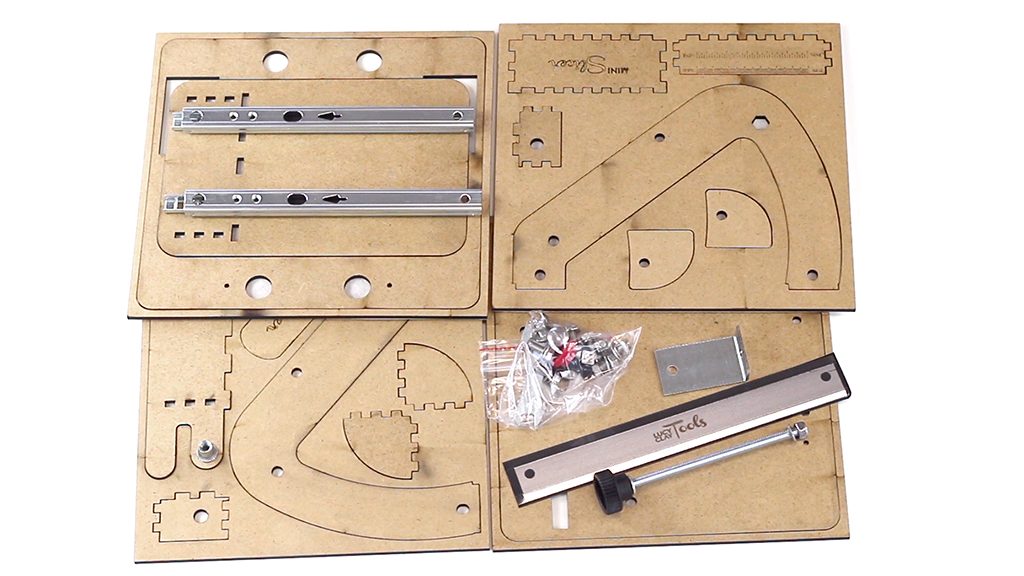
- Slicer Blade
- SAFETY Knob
- 2x L Brackets
- 2x Rail Glides mounted on Slicing Platform
- threaded rod with a Black Knob
- a set of bolts, washers and nuts
- 2x ALIGNMENT PINS for the baseplate/frame
- wrench for tightening the nuts
- screwdriver in the form of a large washer
- individual components of LC Minislicer from the MDF board – 4x units/boards
- assembly instructions/manual
Adhesive for gluing the rear support and the EASE module IS NOT INCLUDED. For gluing, use common wood/paper glue.
Troubleshooting
The correct position of the Backstop Support is inside of the EASE module.
The threaded rod should be practically free of any play, but it has to spin easily. Use the supplied key.
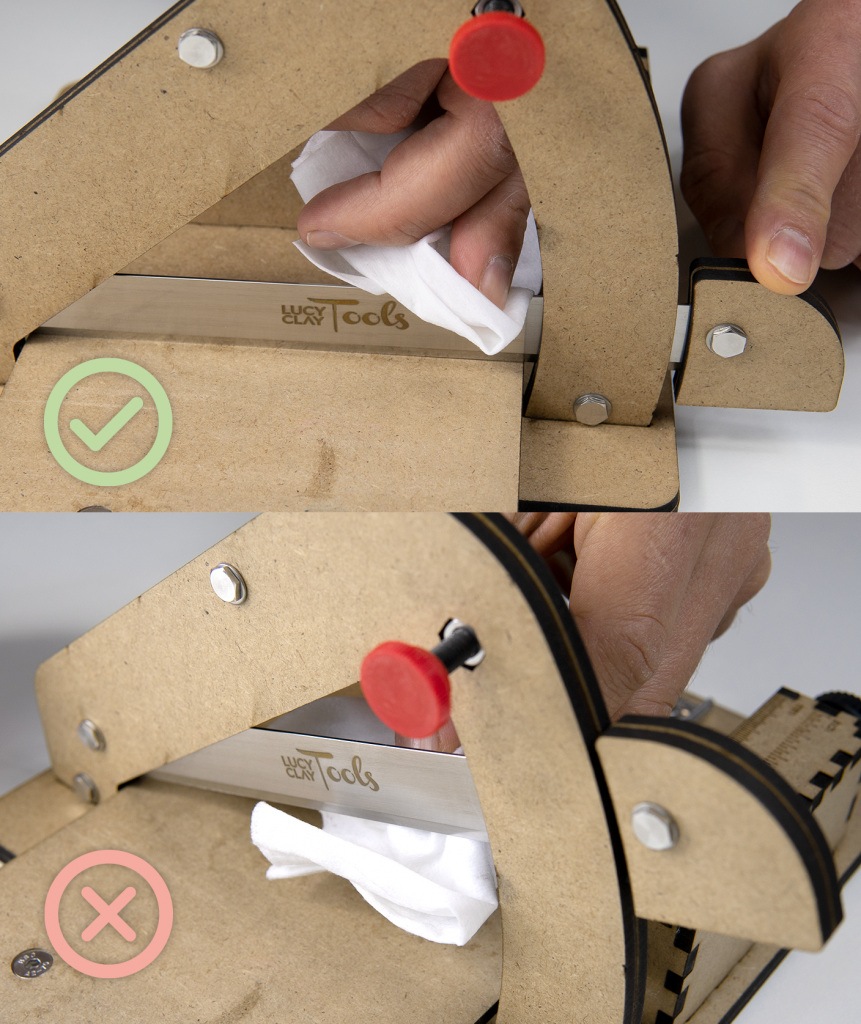 Never put your hand under the edge of the blade. Clean the blade in the lower position. Never clean the blade in any other way.
DOWNLOAD PDF:
Assembly Instructions for LC Mini Slicer
Lucy Clay LC Mini Slicer Review – By Ginger Davis Allman (The Blue Bottle Tree)
Order LC Mini Slicer now:
Lucy Clay Store | Amazon – Lucy Clay
6 Comments
Hi LucyClay 👋. I have the first version of the tan colored mini slicer. I have struggled with the assembly for awhile. The slicer is assembled but I do not understand the threaded rod. I tightened the threaded nut on the front end of the EASE module with the wrench. If I turn the black knob to advance the platform, the nut loosens and the platform will not advance.
I have viewed all videos and instructions. Please help.
Thank you
Hello Laura, please contact our technical support at support@lucyclay.com and they will be happy to help you 🙂
bookmarked!!, I love your site!
Does your site have a contact page? I’m having trouble locating it but,
I’d like to shoot you an e-mail. I’ve got some creative ideas
for your blog you might be interested in hearing. Either way, great website and I look forward to seeing it grow over time.
Hello, sure, please contact us via promo@lucyclay.com
I like what you guys are usually up too. Such clever work and exposure!
Keep up the awesome works guys I’ve incorporated you guys
to my blogroll.