LC Machine Scale for LC Machine – A4 – US Letter
LC Machine Videos
LC Machine: Unboxing & Assembling video (Installation of the crank & Attaching LC MACHINE to the table)
LC Machine: Adjusting the offset between the rollers
Cleaning of the Cleaner Blades
LC Machine in the action
Width Adjuster for LC Machine Squirrel
Coming soon!
LC Machine: Lubrication of the mechanism
LC Machine: Plastic Sheets for Lucy Clay Machine
LC Machine: Use with a cordless drill
Coming soon!
Find the answers to the most frequently asked questions and save your time. If you cannot find the answers you are looking for, address your question to support@lucyclay.com.
1. Introduction
Thank you for your purchase of the LC Machine from LC Tools. You have in your hands a high-quality and robust professional product designed specifically for the processing of polymer clay. The quality of the device was controlled during the production process and an end-line and final inspection was conducted to guarantee its functionality. Your satisfaction is our main aim. These instructions for use contain the device’s specifications, installation, and transport guidelines and instructions and information on setting the device up and putting it to use.
The user/operator shall familiarize themselves with this manual prior to use. It contains important safety and maintenance guidelines. Error-free and safe operation of the device and the length of its useful life are largely dependent on proper and careful maintenance. The operating personnel should fully understand and be familiar with the information contained in all the sections of this manual. Of special importance are the safety precautions included in each chapter. Also included are general precautions for operating this device.
If you are not quite clear about some information contained in this manual, please contact the manufacturer. We recommend that you make a copy of the ‘Instructions for use’ document once you have filled in the information on your purchase and store the original carefully. When working, follow the safety instructions to prevent any risk of injury to yourself or to other persons who may be present.
These instructions are marked with the following warning symbols throughout the manual:
A)  B)
B) C)
C) 
A) CAUTION – HEALTH HAZARD OR RISK OF PROPERTY DAMAGE
B) CRUCIAL INFORMATION FOR THE OPERATING PERSONNEL
C) GENERAL INFORMATION FOR THE OPERATING PERSONNEL
2. Description of the intended use of the device
Any use of the device other than that specified by the manufacturer is inconsistent with the intended use of the device. This device should be operated only by persons who are familiar with its properties and the relevant operating procedures. Any unauthorized modifications to the device without the permission of the manufacturer will relieve the manufacturer of liability for any resulting damages or injuries. If the nature of the machine allows other than the specified intended or prohibited uses, the user accepts all liability. When working, follow the safety instructions to prevent any risk of injury to yourself or to other persons who may be present.
The device has been designed for kneading or conditioning polymer clay. It is manually operated with a crank. Through a hexagonal shaft adapter (optional – not included, order separately), the machine can be driven by a cordless drill or motor.
This device is not designed, certified, or approved for use with foodstuffs.
3. Pre-operational checks

(operations that the operating personnel shall perform before starting the device)
Prior to the start of work, the operator shall check the device for any signs of damage or other issues that might lead to injury or property damage. If such an issue is detected, the operator may not operate the device or continue using it in any way.
4. Warnings & Safety instructions

(operations, activities, and uses which the operators must not perform)
• The safety devices must never be deactivated, removed, or disabled. Do not use the device without the covers. Do not make design modifications to the device unless recommended and approved by the manufacturer; the same applies to the replacement of spare parts with unauthorized components. Do not operate the device if it has any structural or mechanical faults or if its safety elements have been removed.
• Do not touch the moving parts of the device with the body, objects, or tools during its operation. Keep hands, hair, clothing, and tools away from the mechanism while it is in use. Do not remove waste from dangerous areas while the device is in operation. Do not perform any maintenance, cleaning, and repair operations while the device is in operation and when it is not safeguarded against an accidental or automatic start. Do not leave the device unattended while it is in operation.
• Secure the device to a worktable firmly and safely using the magnets or clamp. Prevent a fall of the machine. Personal injury or damage to the machine may result. LC Tools is not liable for the injury.
• The safety devices must be kept in perfect condition at all times. Prior to the start of work, the operating personnel shall conduct a visual inspection of the moving parts of the device for any signs of excessive wear or damage. Do not use the device if there are excessively worn or damaged parts. Before each use, check that the machine is properly secured and clean.
• If the device starts to vibrate with unusual intensity, emit increasing noise or shows other symptoms untypical of normal operation, turn the device off and inspect all parts before resuming use. Damaged equipment must never be used.
• The replacement of damaged parts may be performed by authorized personnel; only authorized spare parts may be used.
• Never use the device when you feel physically or mentally fatigued. Do not use the device while under the influence of alcohol, drugs, or medications which can reduce your ability to respond or affect your attention.
• The device is equipped with strong magnets designed to hold the machine firmly on the table. These magnets may affect devices such as pacemakers. If you have concerns, please before you purchase consult your medical specialist prior to purchase.
• Do not use the device in explosive environments. Do not insert volatile or flammable materials into the device.
• Do not use the device for purposes other than those for which it was designed. The device is intended for indoor use only.
• Work only in good lighting conditions or ensure that adequate artificial lighting is provided.
• Do not operate the device when unauthorized personnel are in close proximity. Younger users (users under the age of 18) must be supervised at all times.
• Use this device only as described in this manual.
• LC Machine is not suitable for use with foodstuffs. The machine is not designed for contact with food. Use with food only at your own responsibility.
5. Danger zone

(zone of increased risk of injury)
• The entire inside area of the device. Keep hands, hair, clothing, and tools away from the machine while it is in use.
6. General description of the product

6.1. Description of the use
The machine is primarily used to knead or condition polymer clay. The material is inserted between the rollers and extruded/compressed by turning the crank. When the material has passed through the mechanism, it can be folded in half and inserted again between the rollers. This procedure is repeated until the material is sufficiently conditioned and supple.
Once the material is conditioned, you can alter its thickness by adjusting the offset between the rollers.
Mixing polymer clay of different colors (‘blending technique’) represents another use of the device.
6.2. Technical description
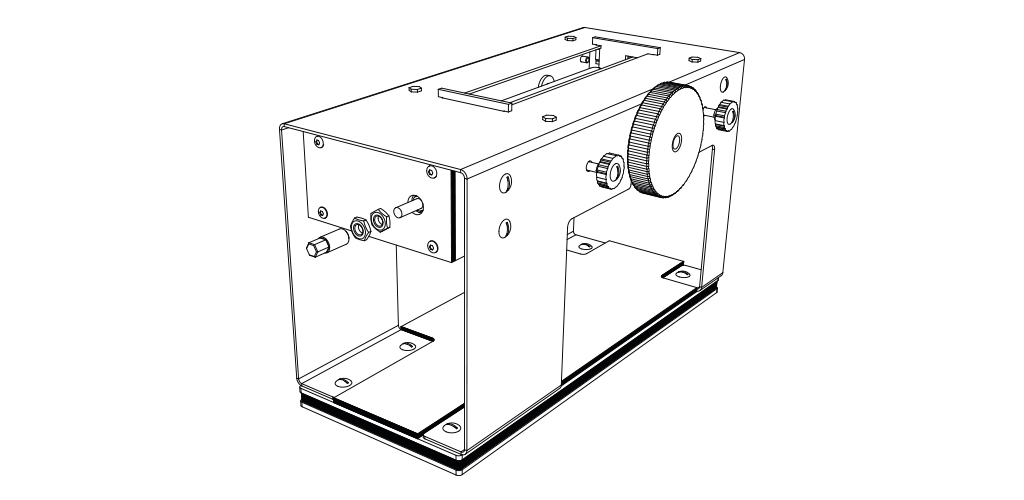
This polymer clay machine consists of the actual mechanism, metal cover with legs, and base plate and has three gears with teeth placed at a constant distance from the center. The gears are fixed to the device’s frame. The drive gear meshes with a pinion (a small gear) providing a gear ratio of 2:1, thereby reducing the force needed. The mechanism is also equipped with an Oldham coupling which is located between the drive gear and the sliding roller shaft. This coupling allows a smooth adjustment of the offset between the rollers. With this system, the offset, or opening, between the rollers can be varied from 0 and 17 mm. You can also order a custom machine with a gap from 0 up to 22 mm.
The rollers have two U-shaped cleaner/scraper blades at the bottom attached to the frame with two bolts. This ensures easy operation and cleaning (loosen the two bolts and remove the cleaner/scraper blade for cleaning).
The machine can be secured to a table with a carpenter clamp or any C-clamp, which is not included. The machine is equipped with magnets and sheet metal rest pads. The rest pads can be placed freely and stuck to the table (observing the prescribed pitch) using double-sided tape (supplied together with the rest pads). This system (magnet + sheet metal rest pads) makes for a very simple way of securing the machine on a table. Further rest pads can be stuck at various locations to create an ergonomic arrangement on your work table that reflects your needs (spare rest pads may be purchased). To disengage the machine from the table, just push it lightly away from you or move the magnets together away from the rest pads to break the magnetic grip holding the machine firmly on the rest pads. Lifting the machine from the rest pads may be somewhat difficult due to the weight of the machine. Take care to avoid injury or strain to your back muscles.
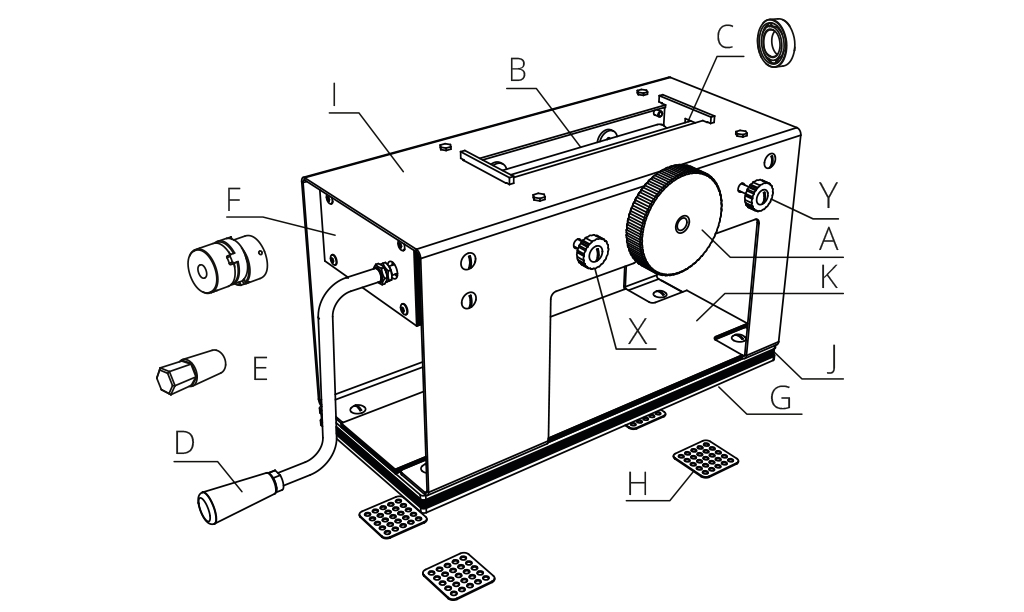
A – linear setup (roller gap dial)
B – rollers
C – lifetime bearing solution
D – crank handle (gear solution 1:2)
E – extension for cordless (Accu) drill/handle (Not included – Order separately)
F – Oldham clutch
G – magnets (4 pcs)
H – metal magnets pads (4 pcs)
I – metal cover with legs
J – base plate
K – cleaning board*
X, Y – supporting screws
* The new cleaning board, for easier cleaning of the base plate. You can easily and quickly remove and replace this board for fast & easy cleaning.
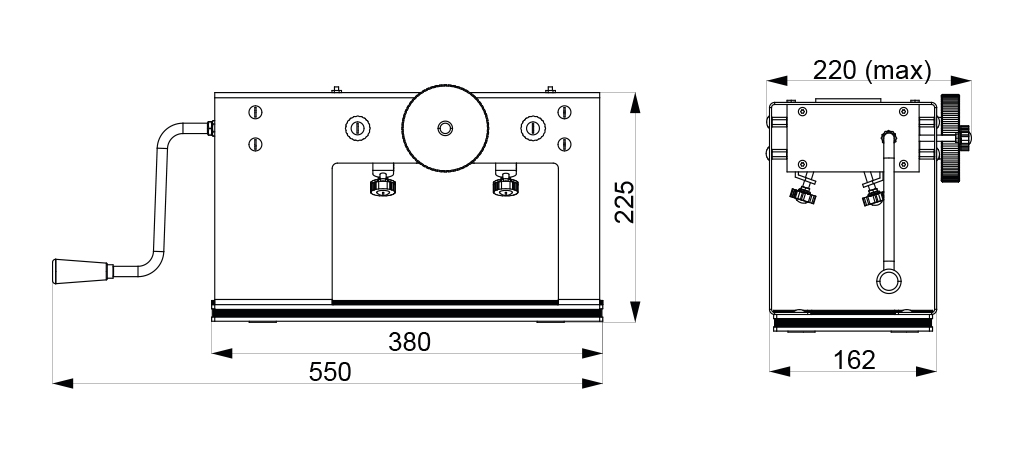
7. Assembly and disassembly of the device/mechanism
7.1 Attaching the adhesive rest pads to the work table
Attach the sheet metal magnetic pads with self-stick tape to the table:
- Place the double-sided tape on sheet metal magnet pads.
- Turn your LC Machine upside down and place sheet metal magnet pads onto round LC Machine magnets.
- Then remove the release paper from the double-sided tape.
- Place your LC Machine on the desired surface.
Please watch for a better understanding: Assembly Video (click to jump up to the video section on this page).
Alternatively, you can secure the rest pads to the table with small screws (the tabletop will be irreversibly damaged, so this is done at your own responsibility). It is important that you observe the offset between the rest pads.
You can decorate the rest pads with your own sticker which matches the color of the table.
You can remove the metal sheet rest pads by tearing them off from the tabletop. Carefully remove any remaining adhesive from the tabletop using toluene (or another adhesive solvent) – keep in mind that toluene is a dangerous substance! Try not to damage your work surface; LC Tools is not responsible for damage to the table.
7.2. Installation of the cleaner blades
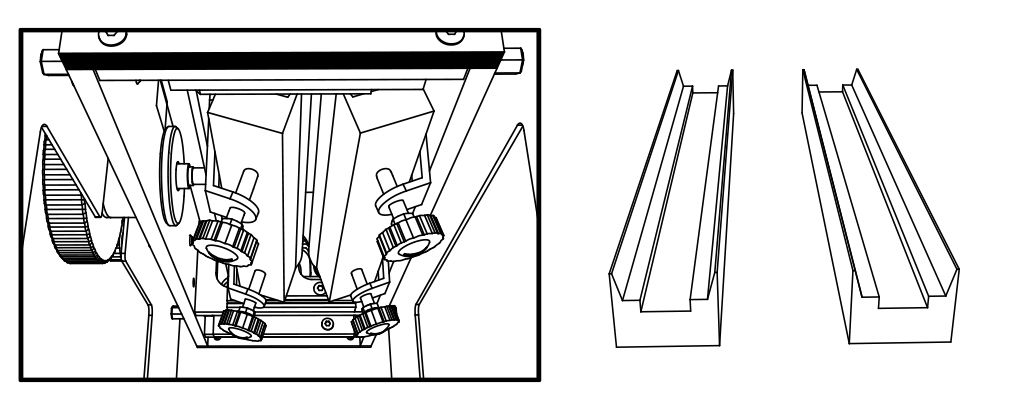
Attach both blades to the rollers. Secure both blades with the bolts. The bolts must be properly tightened to ensure sufficient contact between the blade and the roller for optimal cleaning effect.
7.3. Installation of the crank
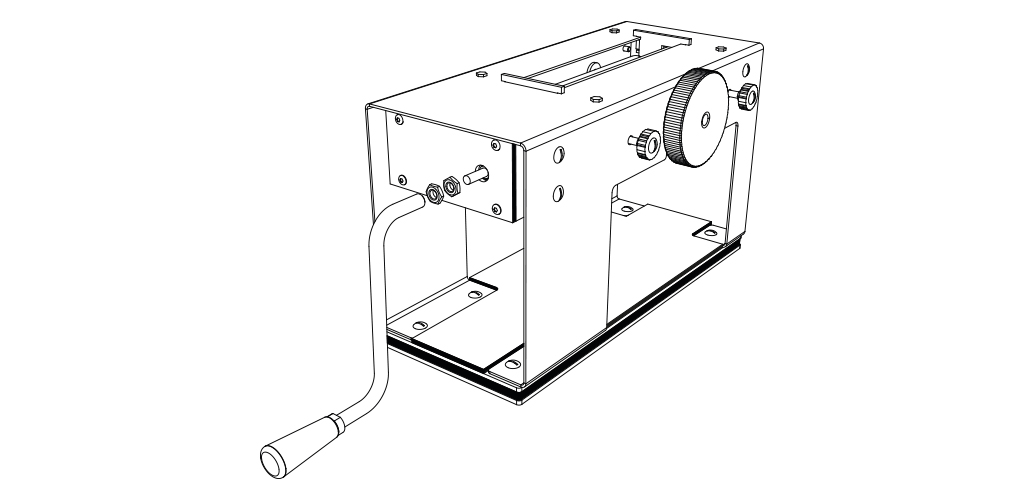
Your device may be powered manually by you through the use of a crank. First, screw two M8 nuts onto the pivot arm of the drive, and then screw on the crank. Tighten the nut closest to the crank using the key tool that is provided in your kit. Next, tighten the nut closest to the device. Tighten it so it is secure against the first nut. This procedure ensures that the crank will not loosen and fall off during operation.
7.4. Installation of the hexagonal shaft adapter (order separately)
In the case that you want to use a cordless power drill instead of the manual crank to drive your device, you will install a hexagonal shaft adapter (order separately) instead of the crank. If the crank is installed, remove it before proceeding.
Screw two M8 nuts onto the pivot arm of the drive, and then screw on the hexagonal shaft adapter after them. Tighten the nut closest to the hexagonal shaft adapter with the key tool in your kit. Ensure that it is firmly against the hexagonal shaft adapter. Tighten the second nut so it is secure against the first. This procedure ensures that the hexagonal shaft adapter will not loosen and fall off during the operation.
• Use the cordless drill only as described in the manual.
• Do not use cordless drill types/models or settings with a speed of more than 350 rpm. Higher speeds increase the risk of hand injury or damage to the adapter.
• To connect the drill chuck to the hexagonal shaft adapter on the machine use a suitable extension, ideally with a Cardan joint, to cope with the axial misalignment of the two devices.
7.5. Ruler
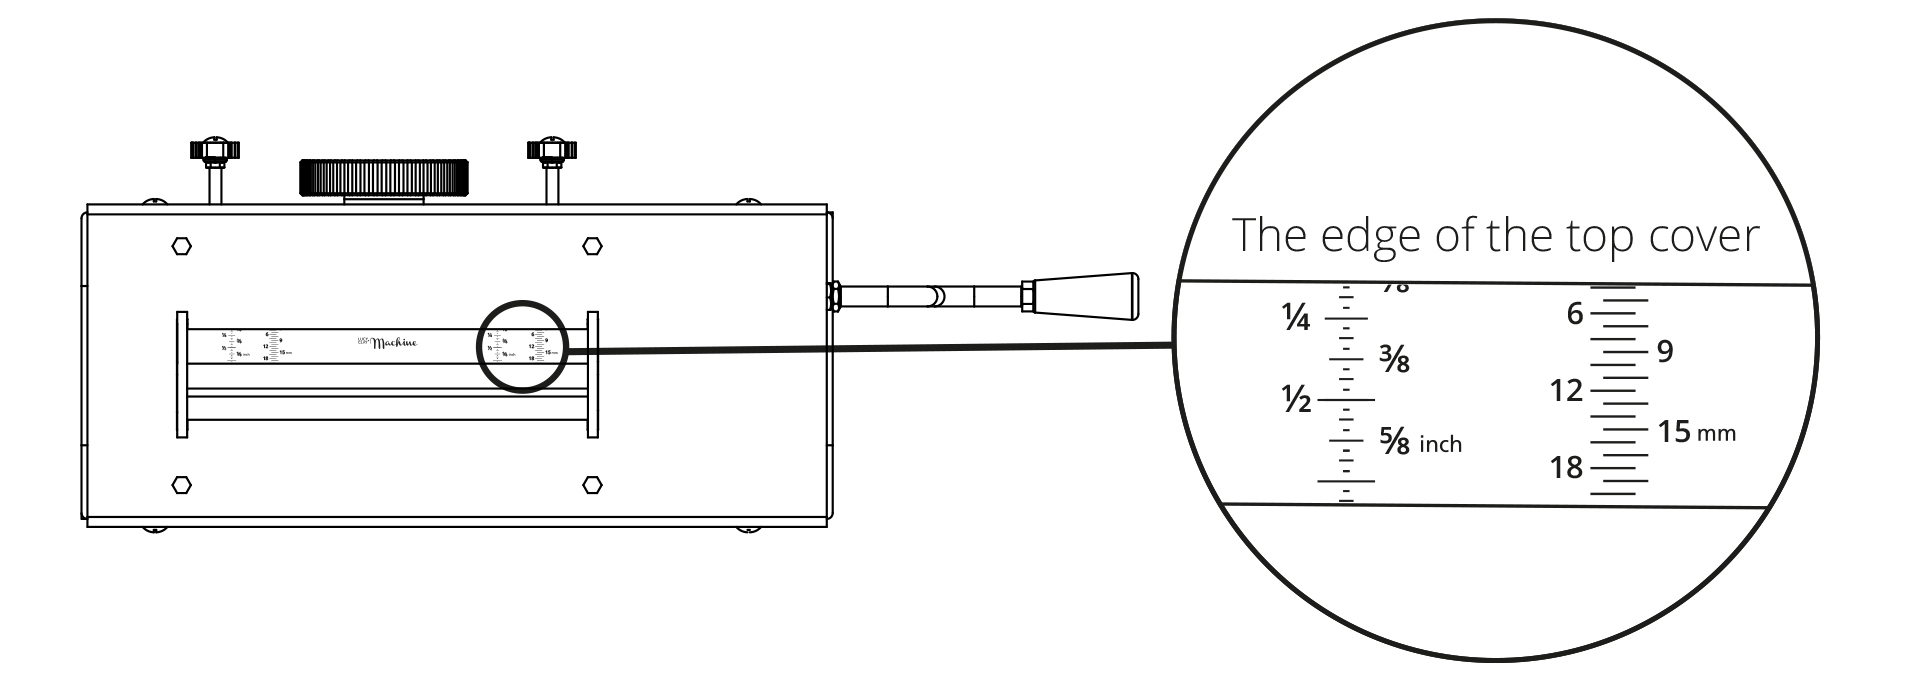
The edge of the top cover shows the size of the gap (see the fig. below – showing 4 mm / approx. 1/8 inch).
8. Operation and functional description

8.1. Kneading polymer clay
Insert the polymer clay into the opening between the rollers and turn the crank to compress it. Once the slice has passed through the mechanism, fold it in half and insert it again between the rollers. This procedure is repeated until the material is sufficiently conditioned and supple.
Once the material has been conditioned, you can change its thickness by adjusting the offset between the rollers.
Mixing polymer clay of different colors (‘blending technique’) represents another use of the device.
8.2. Adjusting the offset between the rollers

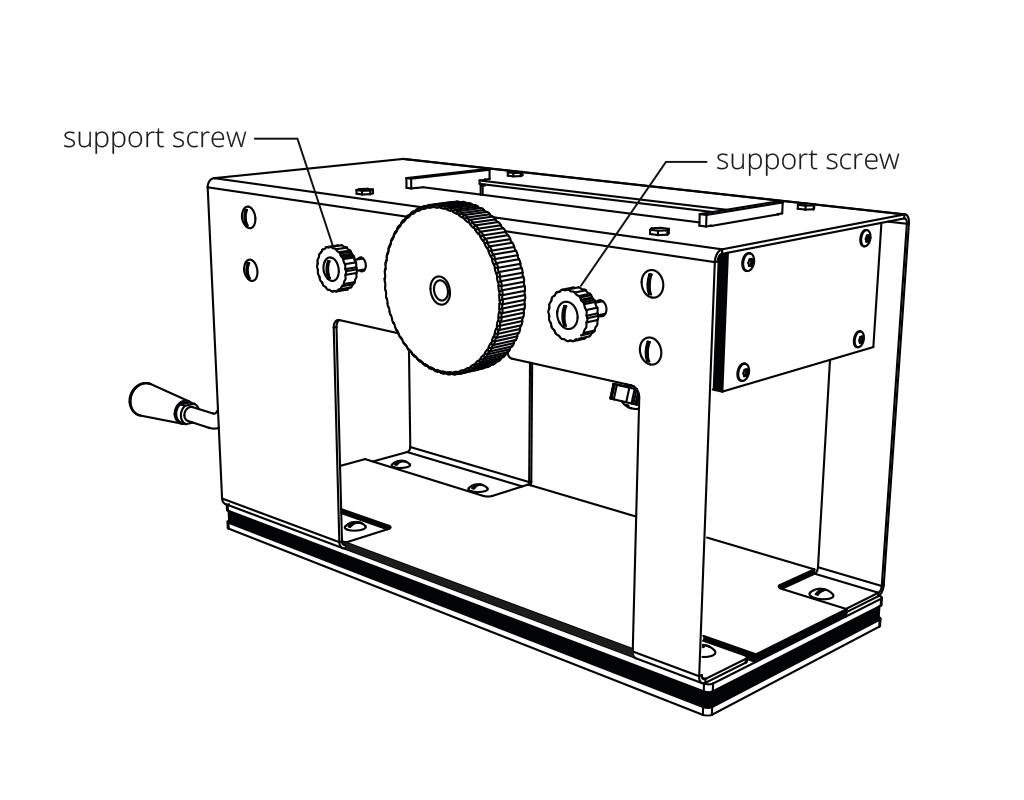
The offset can be adjusted in the range of 0 to 17 mm (or 0 to 22mm – custom machine). Before changing the offset between the rollers, make sure that the support bolts are loose (in case you want to increase the offset). If the knob will not turn when increasing the offset, you need to loosen the support bolts or you have already reached the maximum offset.
NEVER APPLY FORCE WHEN TURNING THE KNOB AND THE SUPPORT BOLTS.
Applying excessive force may strip the screw. LC Tools is not liable for the damage.
The offset itself is adjusted using the knob on the machine. By turning it counterclockwise, you increase the offset. When you turn it clockwise, the offset between the rollers is decreased. If the rollers reach an extreme position, do not try to continue turning the knob by force as this might block the sliding mechanism.
8.3. Locking the roller motion
If you want a polymer clay slice with a specific thickness, lock the rollers in the desired position using the support bolts. Tighten the screws gently until they are secure against the opposite sliding roller frame. This sets the clearances for the precise operation of the rollers with the specified offset.
We recommend that you use the support bolts at all times in order to extend the life of the sliding mechanism.
8.4. Prior to the start of work, check that:
• The machine is correctly placed/secured on the magnetic rest pads or clamped securely
• The crank and the reverse-thread nut are properly fastened, secure and tight
• Clean the cleaner blades and make sure that they are fastened. To achieve the best results, make sure that the bolts holding the blades are properly tightened.
• Set an appropriate offset between the rollers. Lock the roller in the desired position with the support bolts.
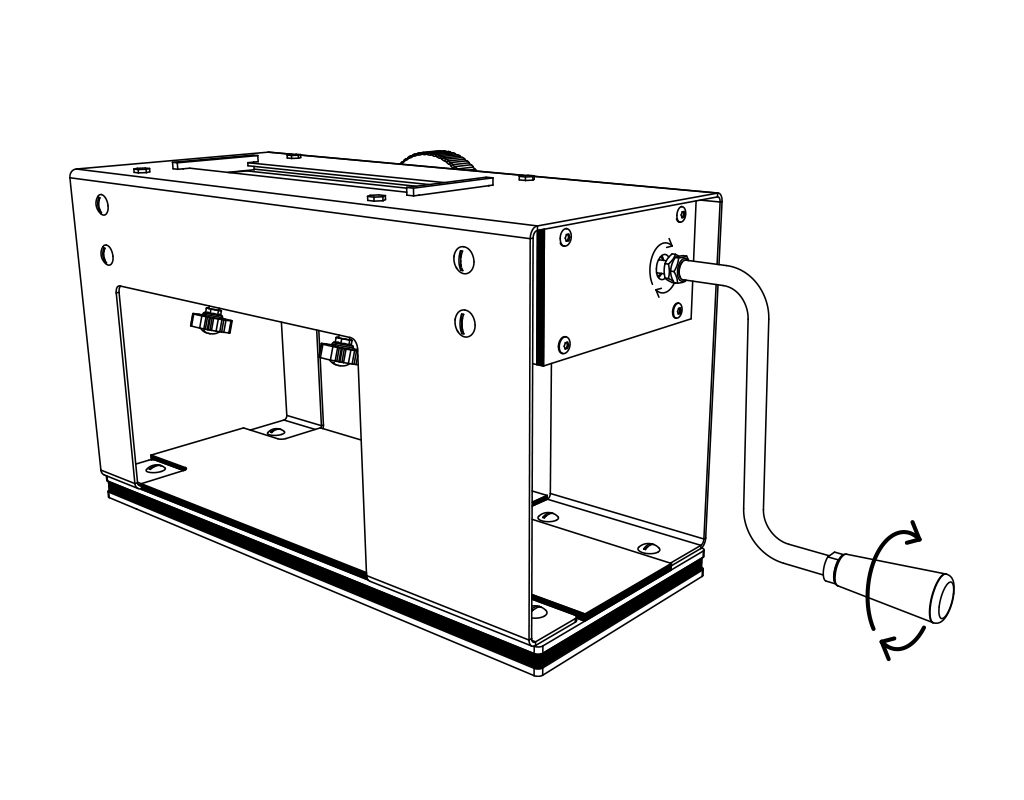
8.5. Direction of the crank’s rotation
Insert a polymer clay block between the rollers and turn the crank forward to extrude the material through the mechanism.
8.6. Securing and releasing the device
If you need to put the device away or move it elsewhere, tear it off lightly/flip it away from the magnetic rest pads (on mounting the rest pads see Chapter 7.1.) and then simply re-attach it. If it is clamped, release the clamps.
8.7. Using a cordless drill as a motor
Unscrew the crank and attach the hexagonal cordless drill adapter (order separately) in its place and secure it with a reverse-thread nut, as described in section 7.4. We recommend placing a Cardan joint between the hexagonal shaft adapter and the drill chuck to eliminate axial misalignment. Cardan joints can be purchased at a hardware store.
Use one hand to control the drill. A maximum speed of 280-350 rpm is needed when using the LC Machine.
9. Service and maintenance

9.1. Regular maintenance after each use of the machine
When you finish work, clean the mechanism with a dry cloth or brush. Do not clean the mechanism with sharp objects (knife, scraper, screwdriver, etc.), and do not wash it with water. Do not use solvents, alcohol-based cleaning products, or other aggressive chemical cleaning products, as these may permanently damage plastic parts.
9.2. Cleaning the rollers
To clean the rollers, remove the cleaner blades, turn the adjustment knob to increase the offset between the rollers, and clean the rollers from the bottom with a dry cloth. This can be done when the device is upside down.
9.3. Cleaning the cleaner blades
During use, clean the cleaner blades on the rollers from time to time and whenever needed. Unscrew the 2 bolts to release the blade, take it out and clean it again with a dry cloth. Then screw the blade back on. Repeat this procedure for the second blade as well.
9.4. Cleaning the surface of the machine
During use, polymer clay may get stuck to the surface of the machine. You should remove this material to prevent build-up and smearing other items. Remove the material carefully to avoid scratching the surface.
10. Warranty/Complaints

LC Tools products are made from high-quality materials which are subject to continuous quality control. They come with a 2-year warranty (a 1-year warranty for cleaner blades). The warranty does not cover damages caused by improper handling and manipulation which is inconsistent with the instructions specified in the product manual.
If you experience any problems, please contact us via this form or via our email at support@lucyclay.com.
11. Spare parts

Any components can be ordered from LC Store here. or by e-mail at support@lucyclay.com
12. Storage – do not expose to frost, dust

Store the device and accessories in a clean and dry location. Do not expose the machine to extreme temperatures.
13. Disposal
When disposing of the device, observe the applicable legislation in the country in which it is used or disposed of.
The device contains:
a) Recyclable materials (reusable materials) which do not represent hazardous waste:
• Aluminium components
• Plastic components
• Steel components
• Magnets
• MDF wood board
b) Materials and substances which constitute hazardous waste under the law:
• Oils and lubricants
• Adhesives

Leave A Reply