• Lucy Clay Web
  • LC Store
  • Amazon
  • About us
  • CATEGORIES

    • Claire
    • Cooperation
    • Czextruder
    • Czextruder guides
    • Czextruder patterns
    • Design events
    • FAQs
    • Guides
    • LC Angle Base guides
    • LC Disks
    • LC Glassymer
    • LC Machine
    • LC Machine guides
    • LC Mini Slicer
    • LC Mini Slicer guides
    • LC Shape Plates
    • LC Slicer
    • LC Slicer & LC Mini Slicer
    • LC Slicer guides
    • Lucy Clay
    • Microstencils
    • News
    • Nezařazené
    • PC tools
    • Polymer Clay
    • Reviews
    • Sales Partners
    • Stencils
    • Tutorials
  • RECENT POSTS

    • Assembly instructions for LC Slicer V5 ECO (2022)
    • LC Machine Elephant 2.0 – Instructions for use
    • How to use motor with Lucy Clay Machine?
    • STEP-BY-STEP DIY POLYMER CLAY TUTORIAL: PETRA VILÍMKOVÁ “JEWELRY DISH” MADE WITH LC MACHINE
    • STEP-BY-STEP DIY POLYMER CLAY TUTORIAL: PETRA VILÍMKOVÁ “TRANSLUCENT NATURAL EARRINGS” MADE WITH LC MINI SLICER
  • ARCHIVES

    • September 2022
    • June 2022
    • March 2022
    • February 2022
    • January 2022
    • December 2021
    • November 2021
    • August 2021
    • July 2021
    • June 2021
    • May 2021
    • April 2021
    • March 2021
    • February 2021
    • January 2021
    • December 2020
    • October 2020
    • September 2020
    • August 2020
    • July 2020
    • June 2020
    • May 2020
    • April 2020
    • March 2020
    • February 2020
    • January 2020
    • December 2019
    • November 2019
    • October 2019
    • September 2019
    • August 2019
    • July 2019
    • June 2019
    • May 2019
    • April 2019
    • March 2019
    • February 2019
    • January 2019
    • November 2018
    • October 2018
    • September 2018
  • META

    • Log in
    • Entries RSS
    • Comments RSS
    • WordPress.org
  • Lucy Clay Web
  • LC Store
  • Amazon
  • About us

STEP-BY-STEP DIY POLYMER CLAY TUTORIAL: Věra Šulcová “Spring pendants” made with LC Microstencils

March 12, 2020

About the author

Věra Šulcová

Due to improperly chosen fields of study and three children, I became a housewife. About ten years ago I discovered the magic of polymer clay and five years ago, when the last “bird” left the family nest, I became addicted. Since then I have been playing with polymer clay and I having a great time almost constantly.


Materials and tools:

• Polymer Clay white and black (Cernit)
• LC Microstencils
• Acrylic paints
• Liquid polymer clay translucent
• Pasta machine
• Glass tile
• Working grid
• Blade, scalpel
• Acrylic roller
• Baking paper
• Czextruder with an extension (circle diameter 1 mm – LC Disk 3)
• Cookie cutters – 3 cm / 1.18′′ diameter circle and 6 x 6 cm / 2.36 x 2.36′′ square
• Ceramic tile
• Instant glue
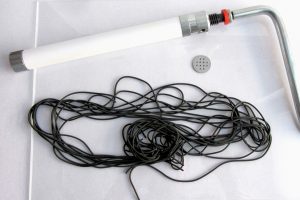
• 2 beading needles 20 mm / 0.78′′
• Jewelry pliers
• Texture sponge, foam sponge, toothpick, sandpaper


Step 1

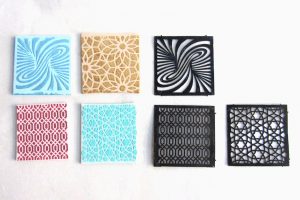
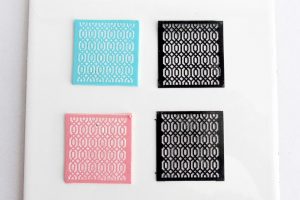
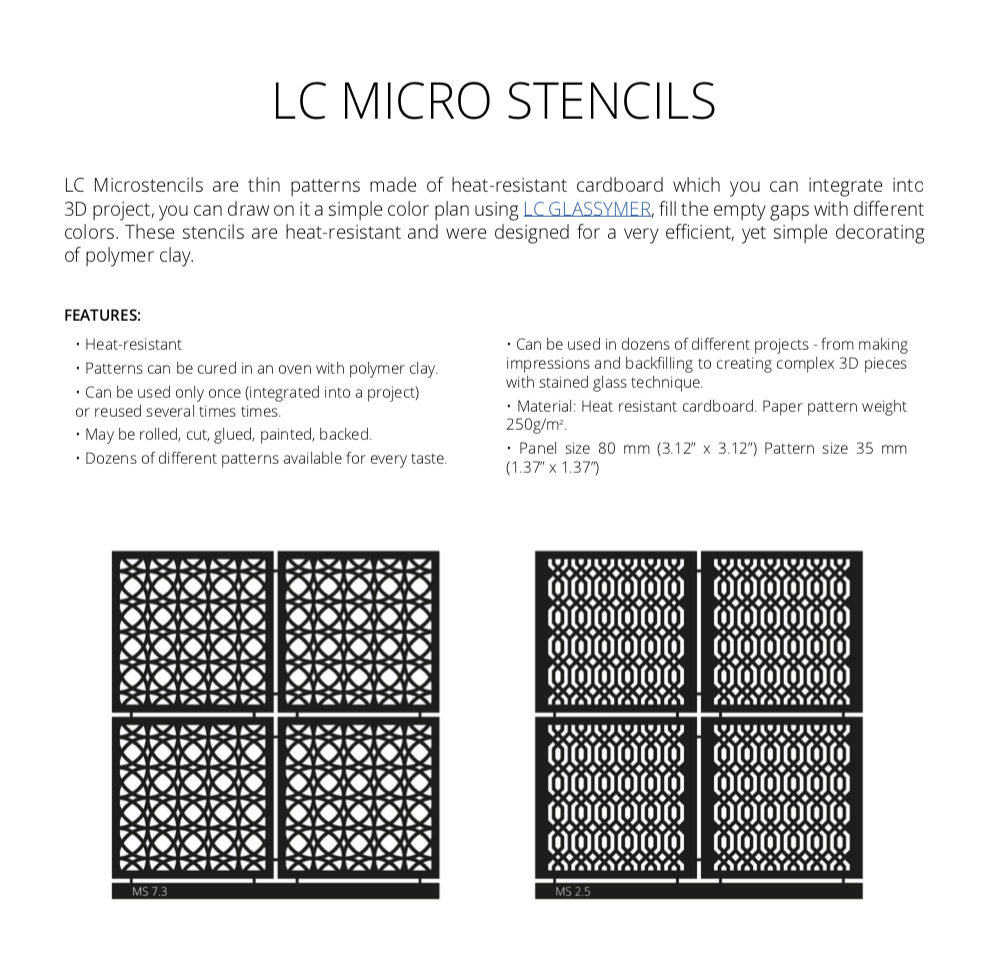
Run conditioned polymer clay of white color (here slightly tinted to the tone of the acrylic paint used) through a pasta machine at the medium setting (Imperia No. 3) and place it on a glass tile. Place the Microstencil on the clay and gently roll over with an acrylic roller. Cut off the edges and apply acrylic paint (I used a foam sponge), remove the stencil and rinse it immediately with water.


Step 2

Extrude black clay using LC Czextruder.


Step 3

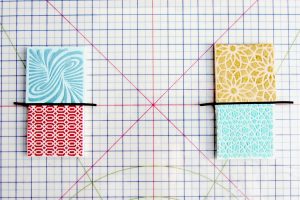
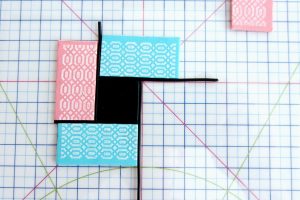
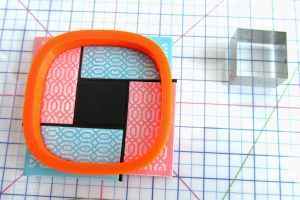
Place one square on the top of the other one, place a piece of a black extrusion between 2 squares, repeat with 2 other squares. Press the squares carefully one against another using baking paper.


Step 4

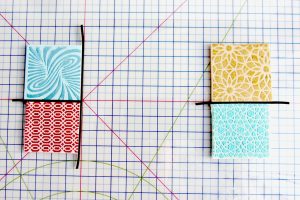
Repeat the same procedure for both pairs of squares.


Step 5

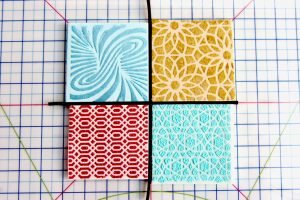
Cover the result with baking paper and gently smooth it with your finger or roller to join the parts together.


Step 6

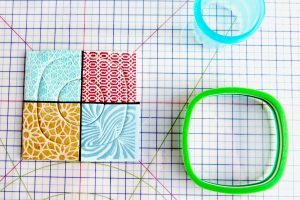
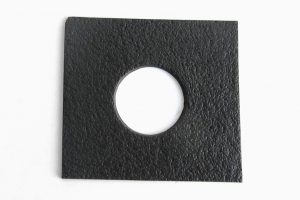
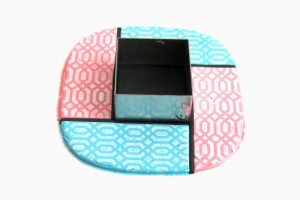
Cut the sheet off the glass, then (still on the glass tile) center the sheet on the grid and cut out 2 shapes – inner and outer (as in photo). Remove the excess clay and carefully place it on the baking tile (I moved it with the central part in order to minimize deformation). Clean the edges with a scalpel and bake for 15 minutes at 130°C / 266°F.


Step 7

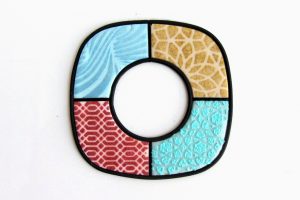
After cooling, coat the entire color area and the edges with liquid polymer to fix the ink and wrap the inner and the outer edge. Bake again at 130°C / 266°F for 15 minutes.


Step 8

Glue the LC Microstencils from the back with instant glue. Glue gradually from one corner to the other. (Use a toothpick to apply the glue. Do not touch your fingers!)


Step 9

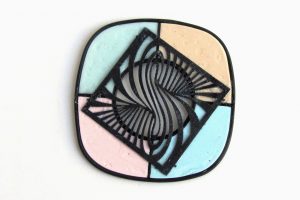
Run conditioned black polymer clay through a pasta machine (Imperia No.4), texture it, cut a circle with the same cutter as white clay and place it on the tile (textured side down). Coat the backside of the piece (only around the LC Microstencil) with liquid polymer and press against the textured black piece. Use a scalpel to trim the excess of clay.


Step 10

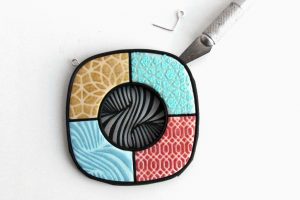
Bend the beading needles with pliers to a right angle. Using the tip of the scalpel, gently move the two layers of the pendant apart and insert the needle so that only the loop peeks out. Press the two layers against each other, clean the edges with a scalpel and bake again for 15 minutes. The finished pendant can be varnished again.
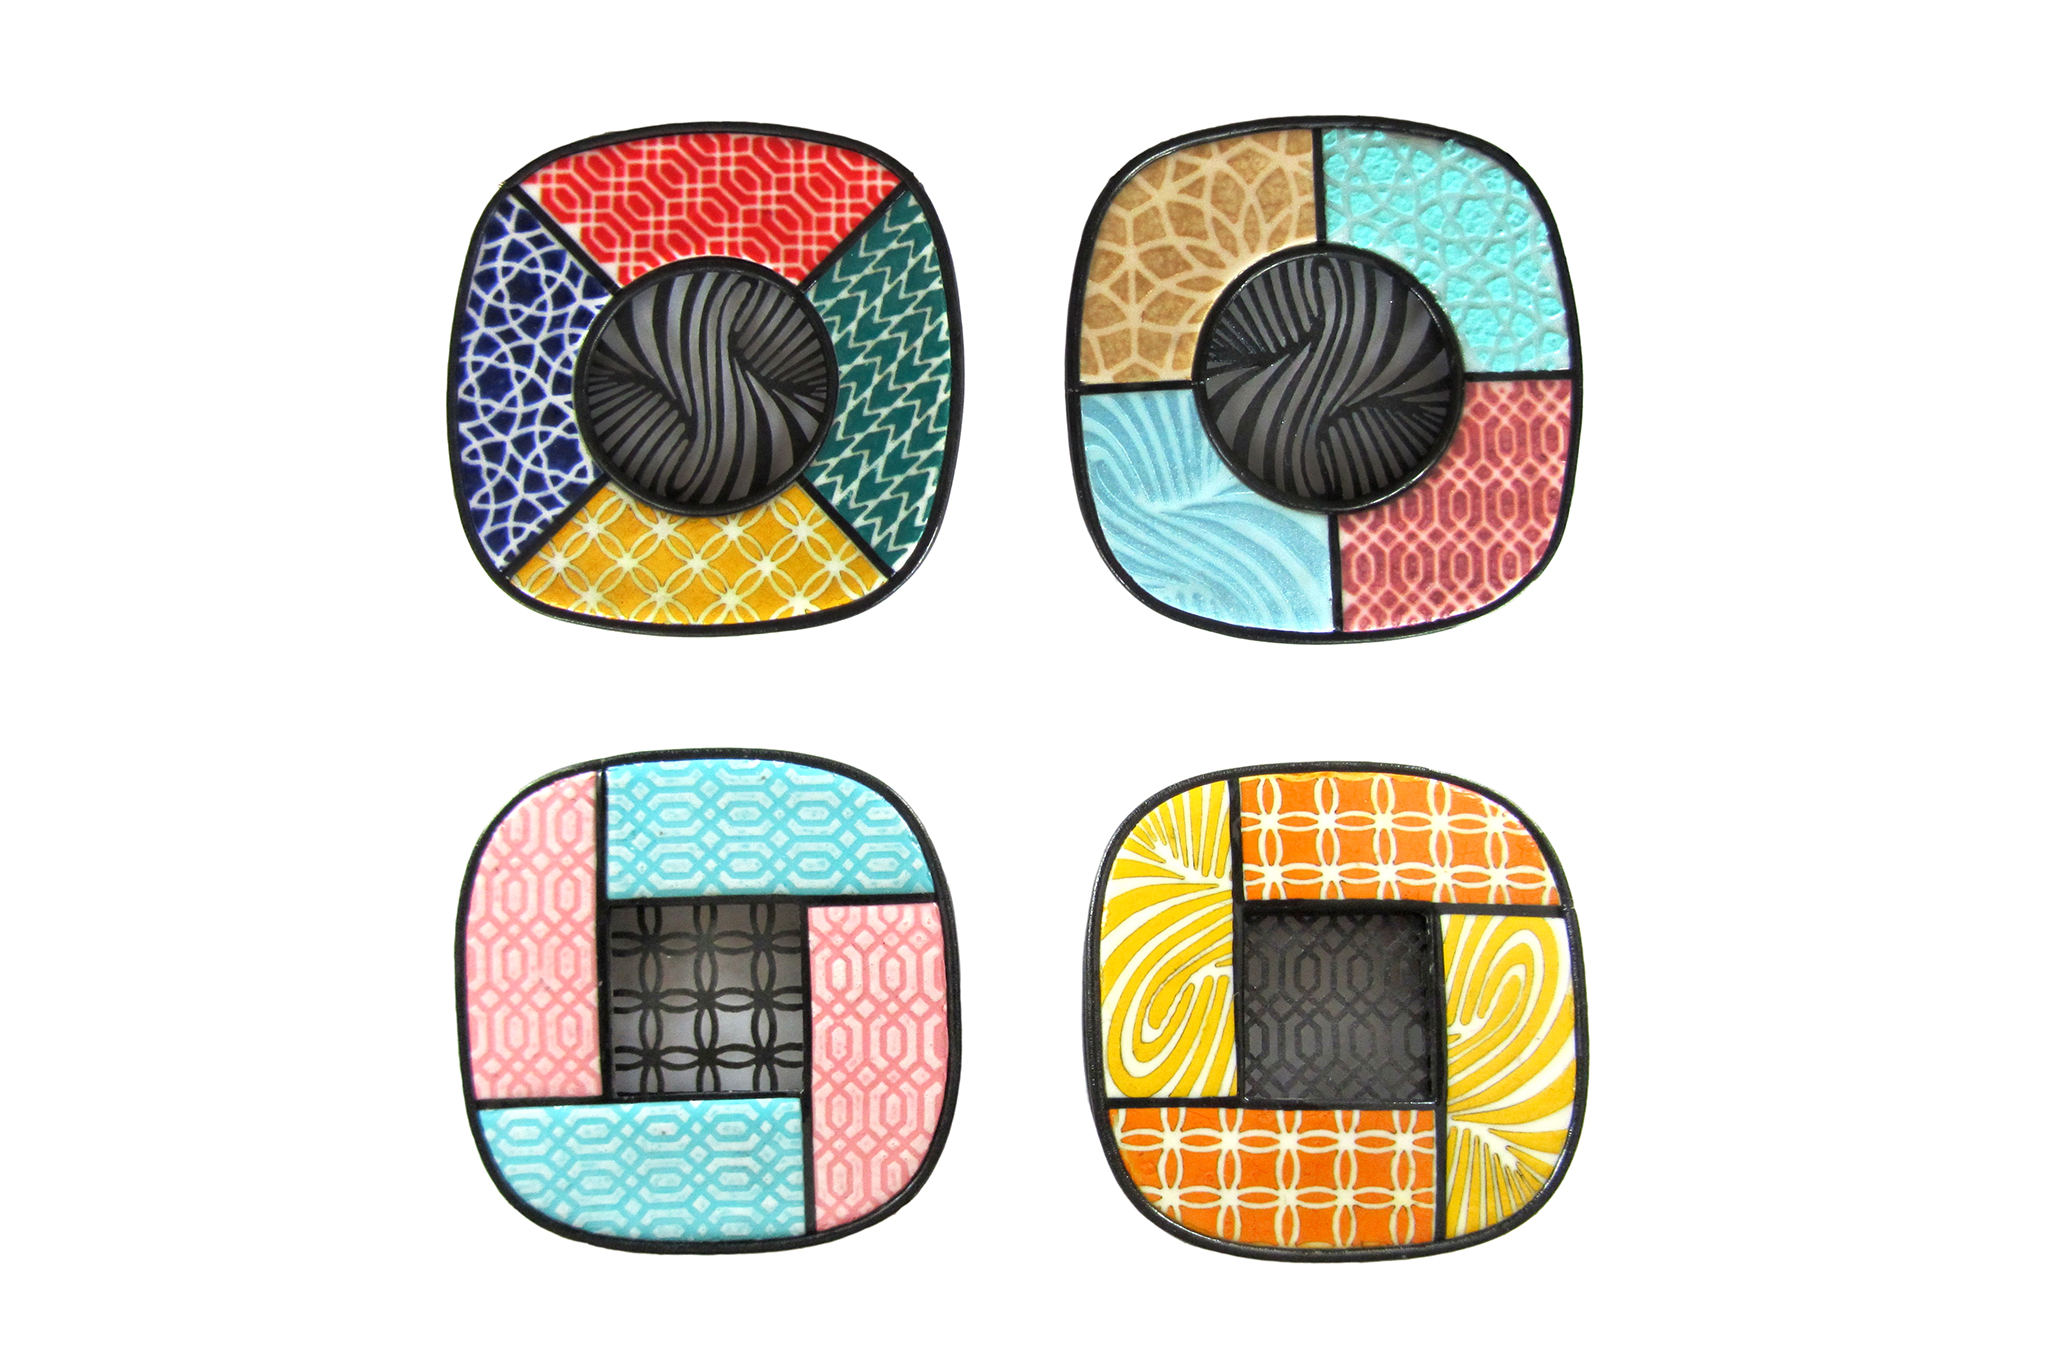


PINWHEEL

Procedure and tools are very similar (instead of circle cutter use a square with 2cm/0.79′′edgeandasquarecutter5x5 cm/2×2′′). Cut the smaller square once the pieces have been joined, this eliminates the hemming of the inner part.


Download PDF tutorial for free: spring-pendants-vera-sulcova


LC MicrostencilsMicrostencilspolymer clay tutorialtutorialtutorials
Share

Microstencils  / Tutorials

Lucy CLAY

You might also like

STEP-BY-STEP DIY POLYMER CLAY TUTORIAL: PETRA VILÍMKOVÁ “SPIRAL EARRINGS” MADE WITH CZEXTRUDER
April 29, 2021
STEP-BY-STEP DIY POLYMER CLAY TUTORIAL: PETRA VILÍMKOVÁ “BOHO PLANT STAND” MADE WITH CZEXTRUDER
April 15, 2021
STEP-BY-STEP DIY POLYMER CLAY TUTORIAL: PETRA VILÍMKOVÁ “EGGSHELL PLANTERS” MADE WITH CZEXTRUDER
March 25, 2021

Leave A Reply


Leave a Reply Cancel reply

You must be logged in to post a comment.

  • Recent Posts

    • Assembly instructions for LC Slicer V5 ECO (2022)
    • LC Machine Elephant 2.0 – Instructions for use
    • How to use motor with Lucy Clay Machine?
    • STEP-BY-STEP DIY POLYMER CLAY TUTORIAL: PETRA VILÍMKOVÁ “JEWELRY DISH” MADE WITH LC MACHINE
    • STEP-BY-STEP DIY POLYMER CLAY TUTORIAL: PETRA VILÍMKOVÁ “TRANSLUCENT NATURAL EARRINGS” MADE WITH LC MINI SLICER
  • Categories

    • Claire
    • Cooperation
    • Czextruder
    • Czextruder guides
    • Czextruder patterns
    • Design events
    • FAQs
    • Guides
    • LC Angle Base guides
    • LC Disks
    • LC Glassymer
    • LC Machine
    • LC Machine guides
    • LC Mini Slicer
    • LC Mini Slicer guides
    • LC Shape Plates
    • LC Slicer
    • LC Slicer & LC Mini Slicer
    • LC Slicer guides
    • Lucy Clay
    • Microstencils
    • News
    • Nezařazené
    • PC tools
    • Polymer Clay
    • Reviews
    • Sales Partners
    • Stencils
    • Tutorials
  • Archives

    • September 2022
    • June 2022
    • March 2022
    • February 2022
    • January 2022
    • December 2021
    • November 2021
    • August 2021
    • July 2021
    • June 2021
    • May 2021
    • April 2021
    • March 2021
    • February 2021
    • January 2021
    • December 2020
    • October 2020
    • September 2020
    • August 2020
    • July 2020
    • June 2020
    • May 2020
    • April 2020
    • March 2020
    • February 2020
    • January 2020
    • December 2019
    • November 2019
    • October 2019
    • September 2019
    • August 2019
    • July 2019
    • June 2019
    • May 2019
    • April 2019
    • March 2019
    • February 2019
    • January 2019
    • November 2018
    • October 2018
    • September 2018
  • Meta

    • Log in
    • Entries RSS
    • Comments RSS
    • WordPress.org


@lucyclaytools

© Copyright 2013-2020, LC Tools s.r.o.