YTB video of the real assembly process (DIY kit):
YTB video of the real assembly process (pre-assembled version):
YTB video of the blade adjustment:
Background:
This LC Slicer – redesign 2019, was focused on production processes and supplier base. Previous material Dibond was substituted by Acrylic plastic which can be cut by laser. By doing so, we managed to keep low manufacturing costs and ensure affordability for end users. In the event of damage to or wear of any part, it is not a problem to ask LC Tools to send a spare part.
Now it is on the user to simply assemble the individual parts and glue them where necessary, or join them with a bolt.
We firmly believe that this redesigned tool will become as popular as other tools from the LC Tools professional series and will quickly expand among enthusiasts for polymer clay.
We would appreciate if you sent us the images and projects in which LC Slicer was used. Interesting projects will be shared on Lucy Clay social networks.
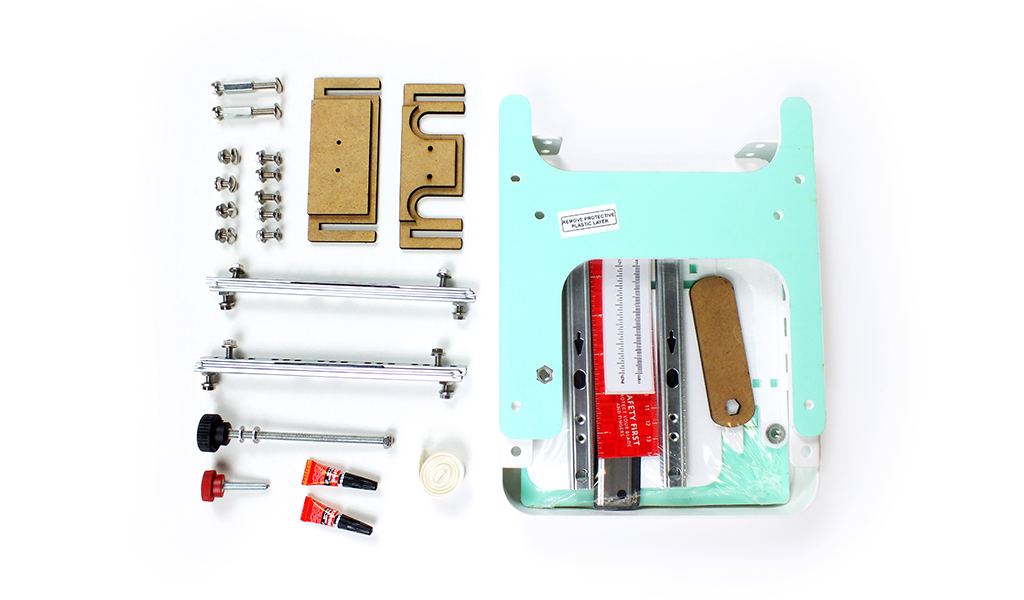
Contents of packaging:
- Slicer Blade and a red magnetic protective sheet
- SAFETY red knob
- 2x MDF board fixtures
- 2x Rail Glides mounted on slicing platform
- 2x Rail Glides to be mounted on the main frame
- Threaded rod with a black knob
- A set of bolts and nuts
- Wrench for tightening the nuts
- Screwdriver in the form of a large washer
- Individual components of LC Slicer from the acrylic board
- White metal main frame
- Assembly instructions/manual
- Adhesive 2-3g (superglue) for gluing the rear support and the EASE module
- Sticker with mm/inch scale for easy setting of the slicing thickness
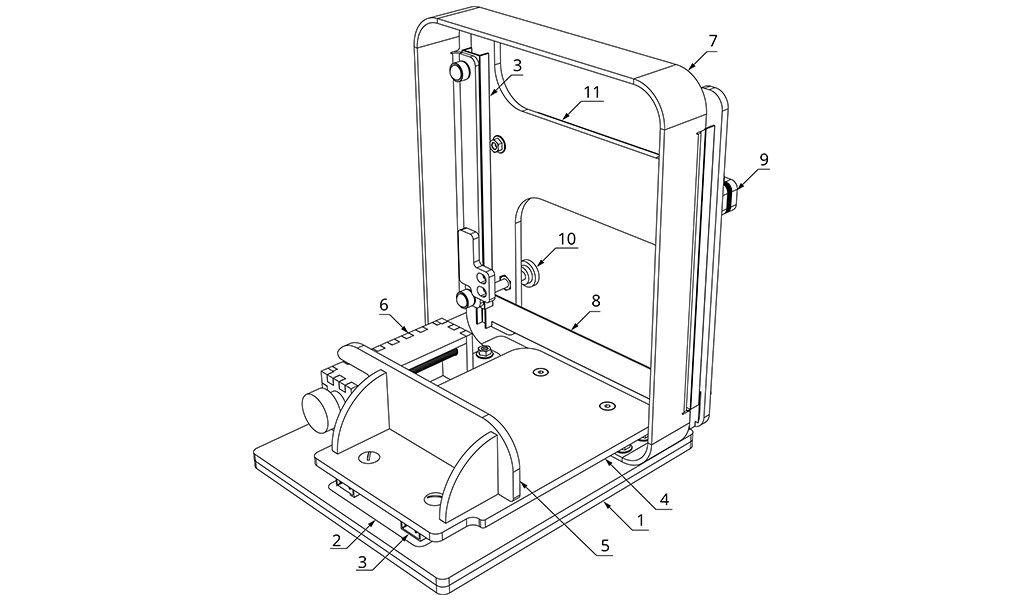
Basic parts of LC Slicer:
- Baseplate Frame
- Baseplate
- 4x Rail Glides
- Slicing Platform
- Backstop Support
- EASE Module with threaded rod
- Frame
- Slicer Blade
- Slicer Blade Handle
- SAFETY Knob
- Front frame deckel
The New LC Slicer is fabricated from Laser Cut acrylic board.
The LC Slicer can be set up with Left or Right Handed orientation of your preference. Similarly, the EASE Module can be positioned on the left or on the right. To change the position, you can easily turn over the baseplate which moves the gluing holes for the EASE module to the other side.
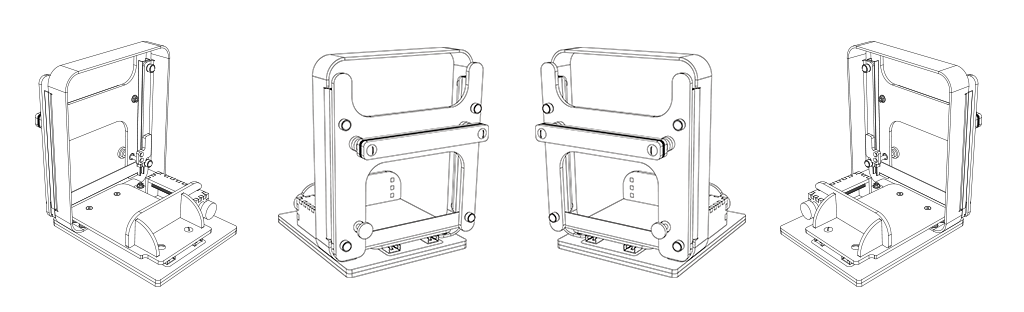
EASE Definition: The threaded rod with knob and housing block that advances the slicing platform forward and backward incrementally.
Once the EASE Module and the back support are glued with adhesive, the left or right-handed position cannot be changed. It is therefore advisable to test the desired position beforehand without gluing, and then you can consider it thoroughly and proceed to carry out the final installation with the adhesive.
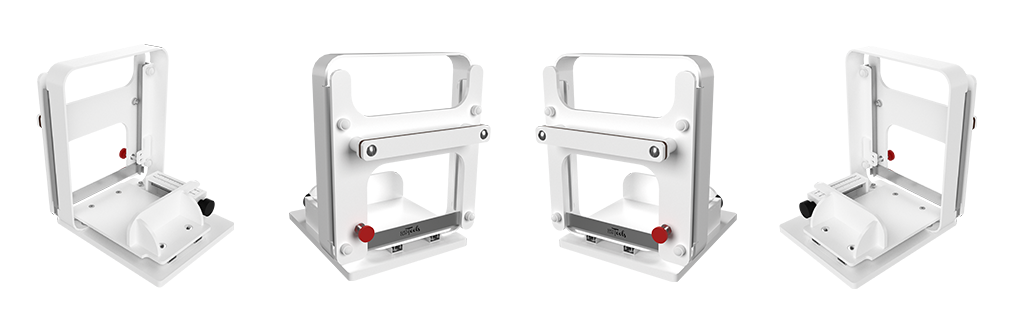
Lucy Clay offers two versions:
- DIY kit – the user must put all items together and use glue to fix it
- Preassembled Left / Right version – the user just put the frame and handle on and slicer is done
Basic installation steps:
Before starting assembly, please watch assembly video instruction which can help to understand each step easily.
Every part may be covered on at least one side by the protective green or white/transparent plastic sheet which supposes to be removed prior next assembly (except parts for EASE module).
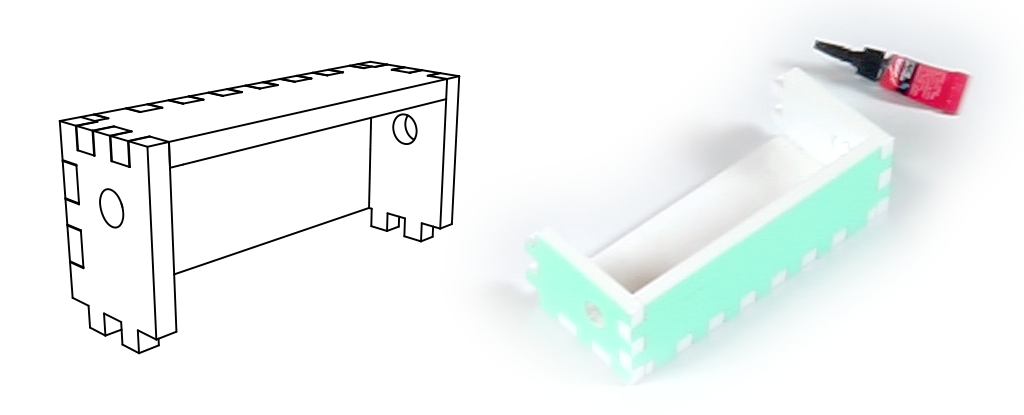
1. Handle assembly
Stack 2 plastic handle parts with one MDF part in between. Insert a screw in each end and secure with a hex cylinder from the opposite side. Add 4 plastic hex washers over each hex cylinder. Set assembled handle aside for later assembly instructions.
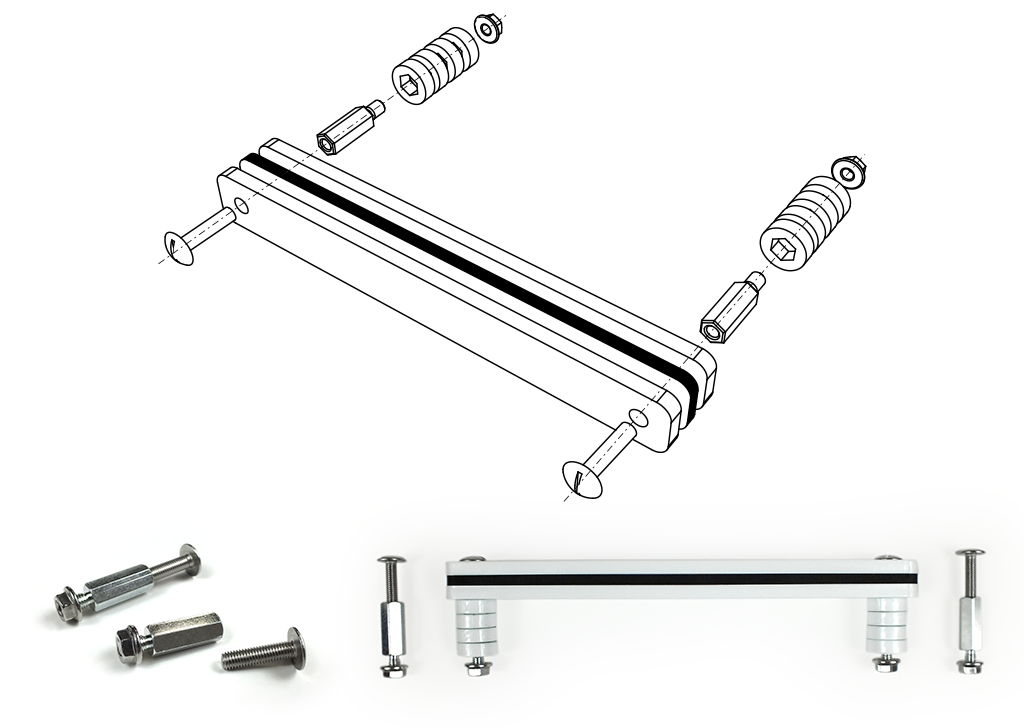
2. The front “H-shape” deckel/cover assembly on frame “runners”
ATTENTION: Before starting assembly on the next part you must make a decision as to the Left or Right orientation of the EASE and safety knob placement. The corresponding positioning of the H-Shape deckel, the safety knob housing and EASE are necessary for proper assembly.
Set Rail Glides on the Blade Frame positioning the threaded bolts into the frame. Place each end of the Slice Blade over corresponding lower threaded bolts with the beveled edge of the blade facing you and downward. Attach the white H-Shape deckel using 4 nuts to secure to Rail Guides. Secure 4 nuts on the backside of Rail Guides. Add white cap covers to nuts when the assembly is complete.
Now insert the handle into the front H-shape deckle and fix it by 2x nuts.
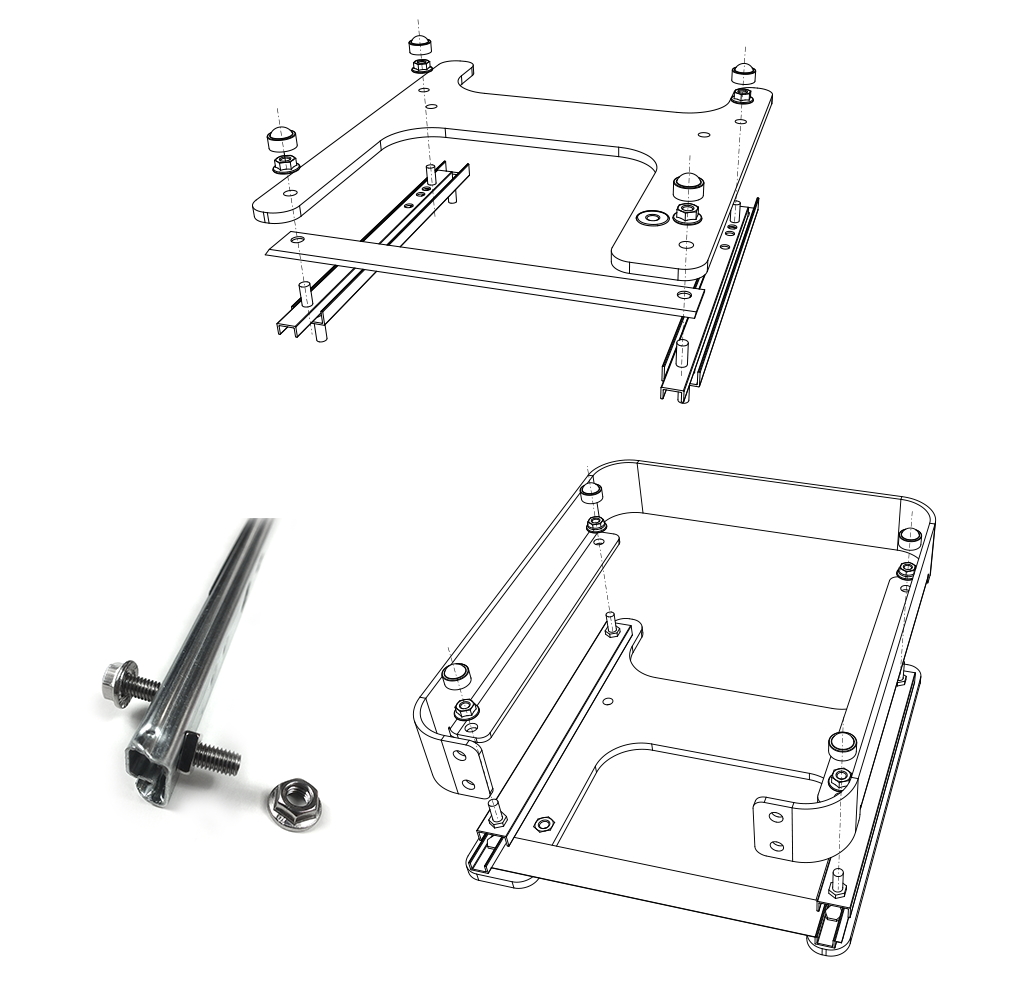
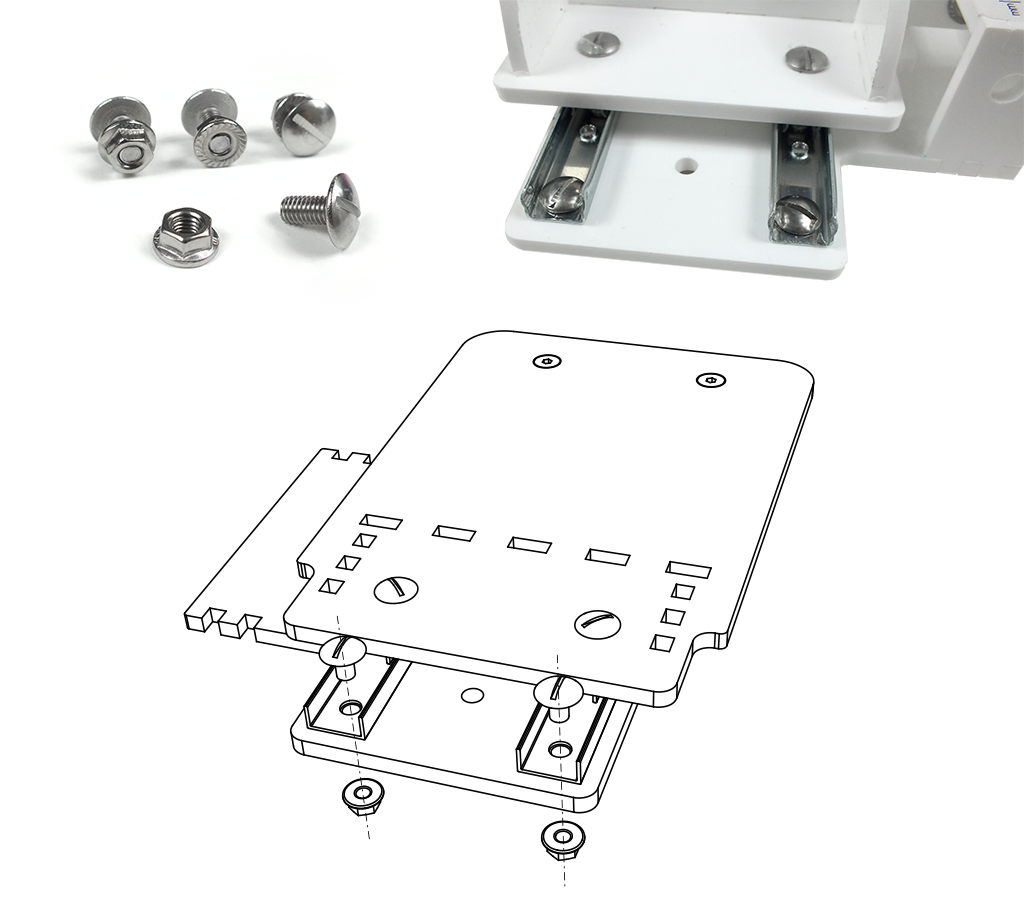
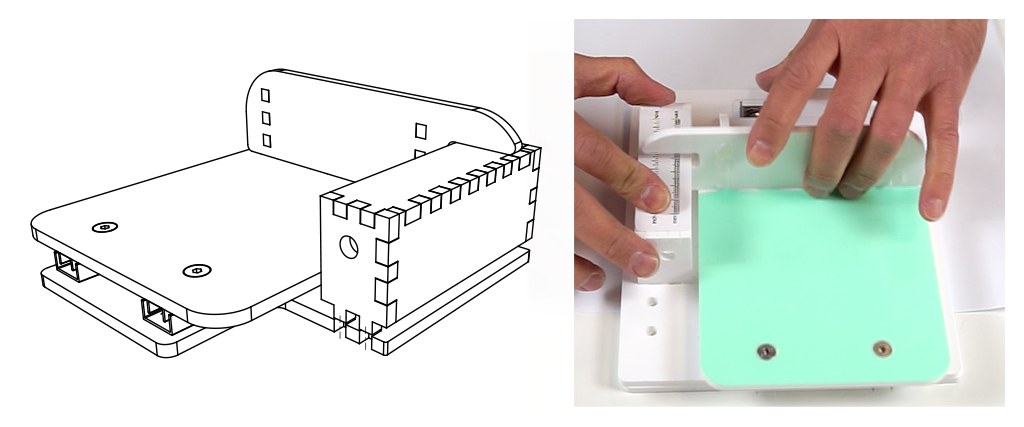
3. Slicing Platform assembly
ATTENTION: Observe Left / Right option !!!
LC Tools provides slicing platform with preassembled Rail Glides. Use 4 screws/nuts to attach platform with glides onto the baseboard.
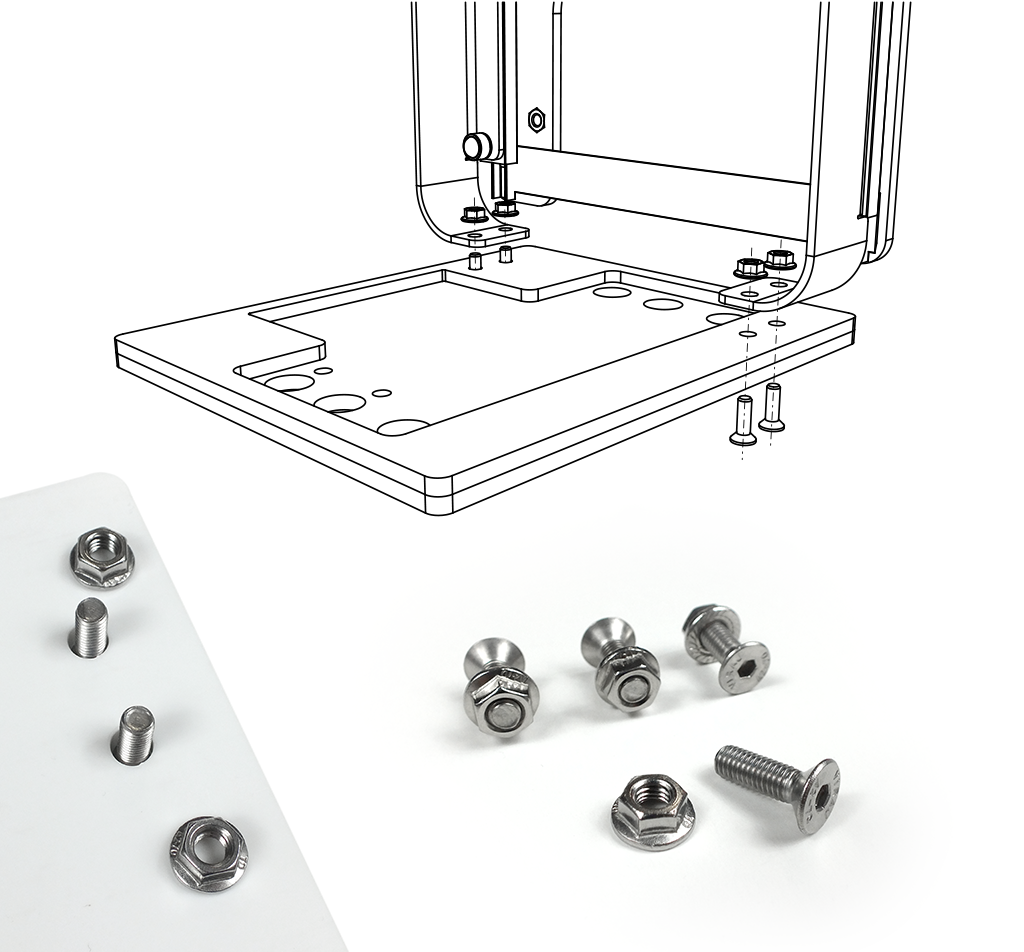
4. Installation of frame on the baseboard
ATTENTION: Observe Left / Right option !!!
Put the assembled Blade Frame on the main board and secure with 4 screws/nuts.
5. GLUE part installation – ease module and backstop support
Ease glue step
Apply super glue on one part on each segment and in the gap. After putting all 3 parts together insert the EASE into the board’s holes to fix it.
Keep it pressed together by hand for about 2 mins to make sure glue dries in the position of parts is correct.
Well, keep green surface protecting sheet on till you finish glue steps to keep the surface clean.
The best way to see how to apply the glue is to watch video on youtube – link here.
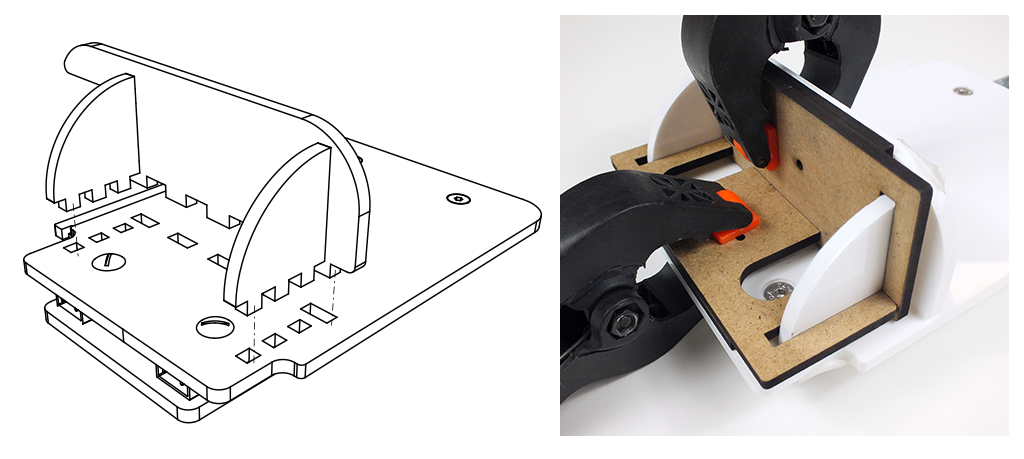
Backstop part glue step
ATTENTION: Observe Left / Right option !!!
The corresponding video to the assembly process of the LC Slicer is a very good aid, particularly for this step.
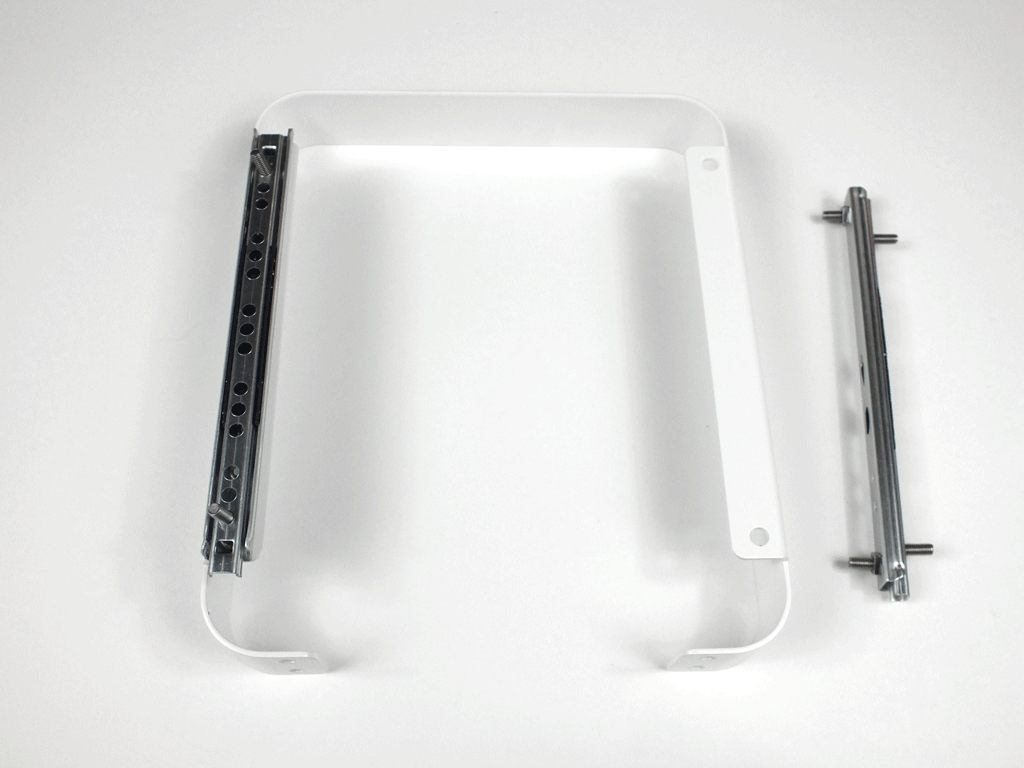
First glue and assemble the Backstop Ribs to the main Backstop panel only. At this time do not glue the Backstop to the Slicing platform. Temporarily place the Backstop in position and use the MDF support templates and clamps to hold in position while the glue dries 10-15 minutes.
Remove clamps and MDF support template. Prepare Slicing platform and Rails for the next step.
Using a white tacky protective sheet that is peeled off of the Baseplate to seal the holes and mechanism from the bottom side of the Slicing platform to prevent the glue from dripping through into the rails. Please see the video!
Apply the glue as in the previous step only on Backstop part with its ribs and use MDF fixture as a temporary support while allowing the glue to dry for 10 to 15 minutes. Proper placement of the Backstop is key to the precise motion of the EASE. Use the MDF Support templates to secure the proper positioning of the backstop while the glue is drying. Use clamps to ensure pressure while the glue dries fully.
As the final step apply glue on the bottom edge of the EASE module and insert it on the baseboard and hold it with hand pressure for a while to secure it while the glue dries.
Before inserting, remove green plastic sheet and apply a sticker with simple grid.
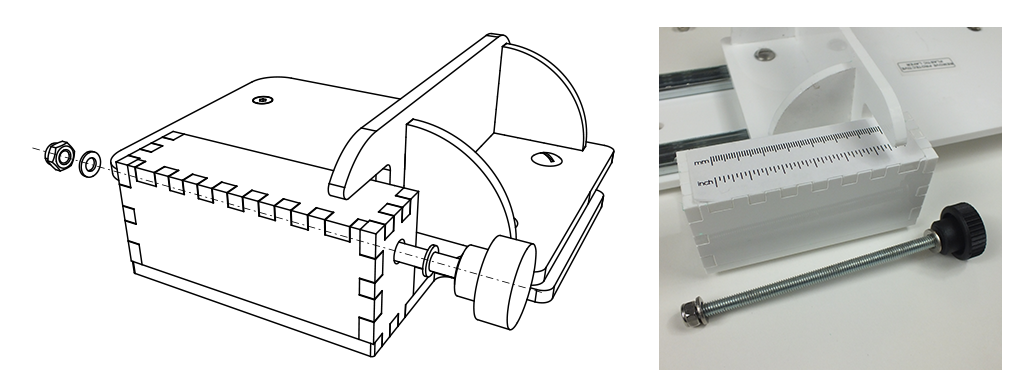
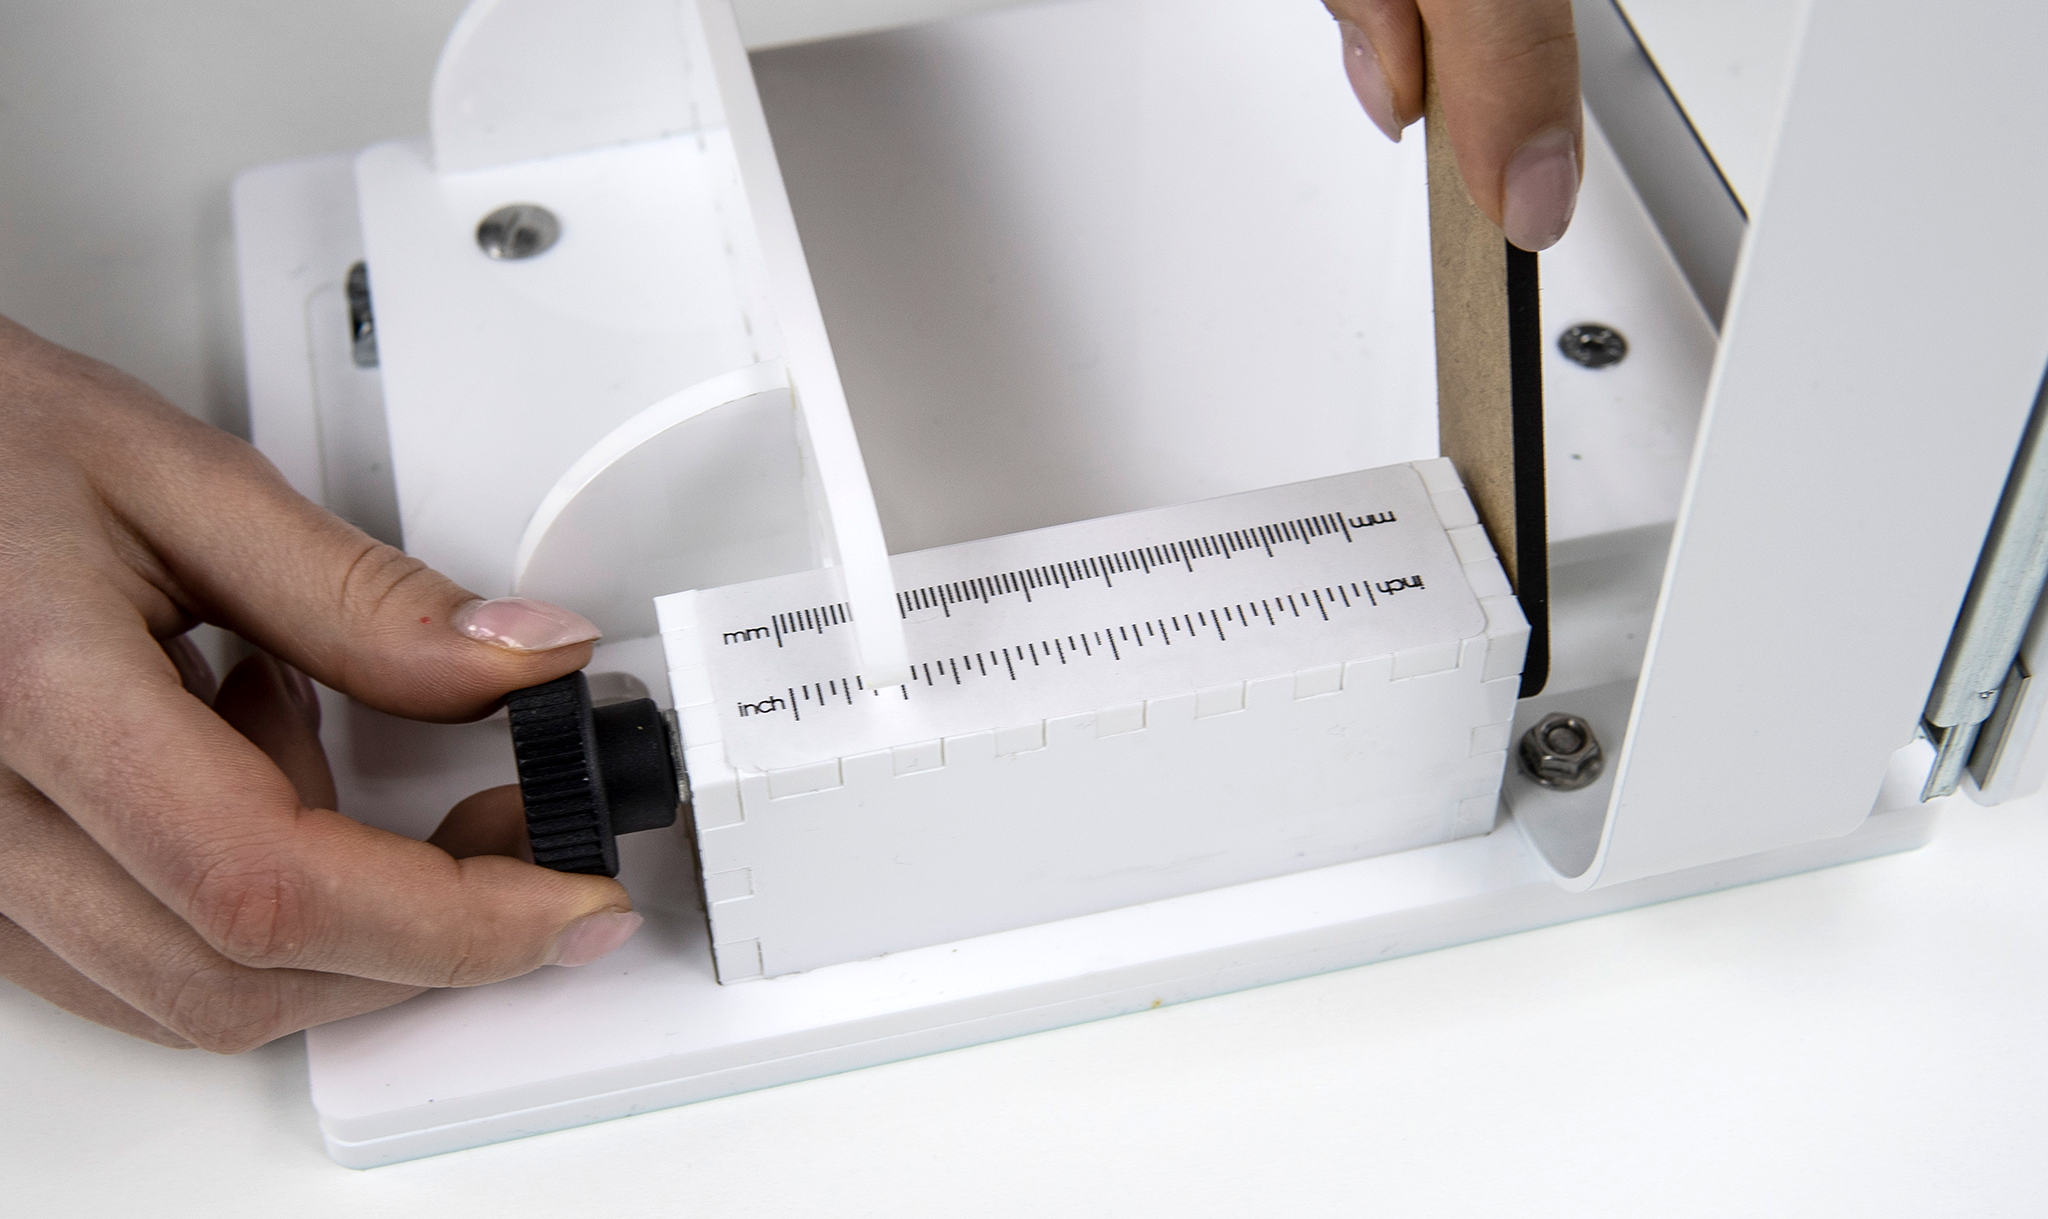
 6. The rod with black knob installation
Insert the rod with black knob into EASE and thread through the nut in backstop part. Next, add a metal washer and nut at the end of threaded rod. Use MDF wrench to tighten the nut.
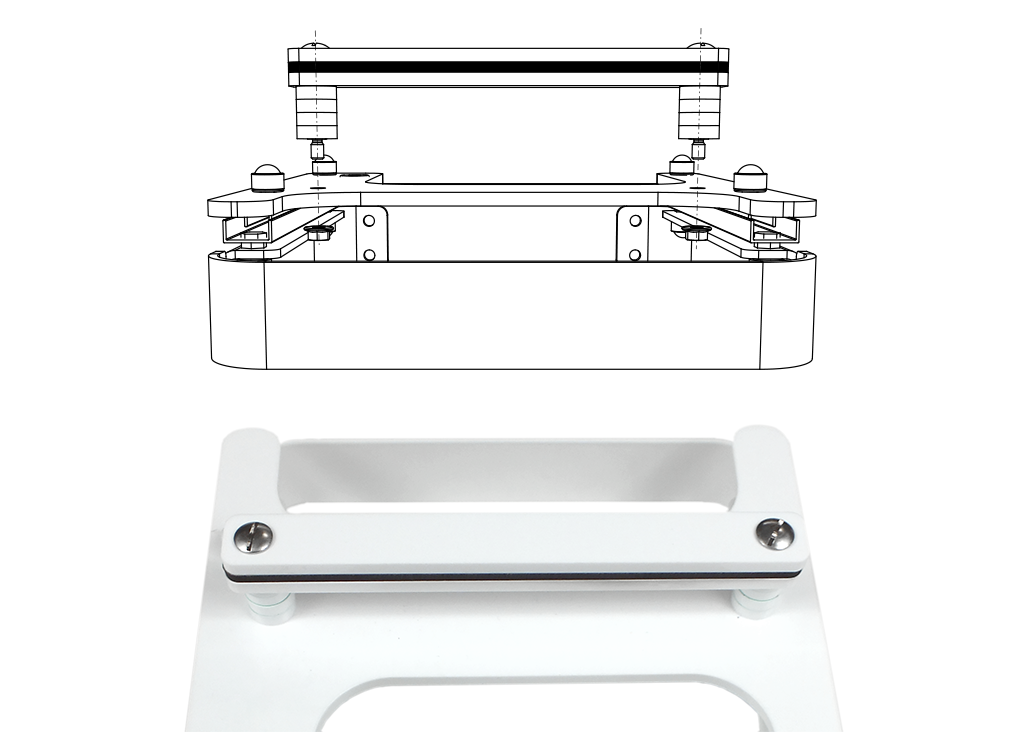
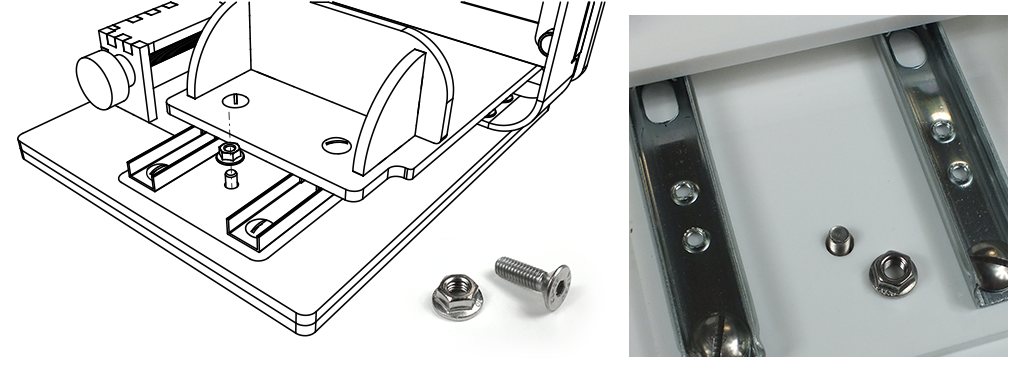
7. Putting the base platform into baseboard and slicer is ready
When you insert the platform into the baseboard you can secure them together with the last screw, which keeps your slicing platform secured in position.
8. Safety knob support installation
ATTENTION: Observe Left / Right option !!!
Use double sided tape applied on the small Safety Knob Support part. Position for alignment of the Safety Knob.

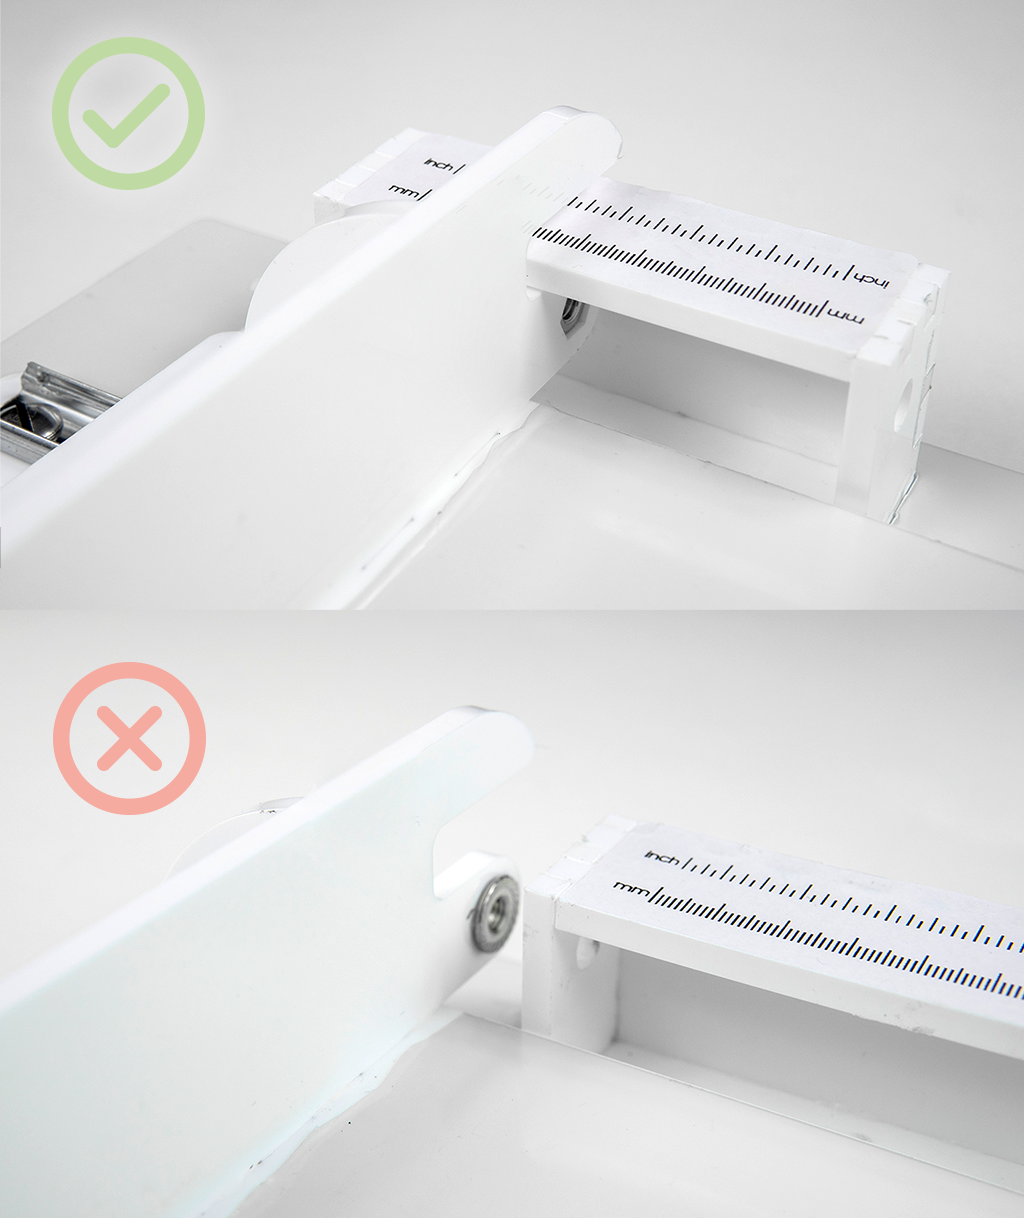
9. Blade edge balancing steps
Please watch video instruction.
Loosen the 2 screws holding the slicer blade on H-shape deckel and adjust the gap between the blade’s edge and slicing platform making sure the blade is level and evenly touches the span of the platform. Then tighten both screws.
You can adjust the gap anytime when needed.
SAFETY:
- The LC Slicer should only be used for slicing polymer clay.
- Before using the LC Slicer, make sure to place it on a firm horizontal surface/anti-slip mat.
- Once you finish working with the LC Slicer, make sure to put the Slicer Blade down and securing Blade with the red SAFETY Knob tightened to secure. This should prevent accidental contact of the Slicer Blade and the hand. Cover the blade by the red magnetic sheet with the simple scale to prevent any interaction with the blade’s edge which is very sharp.
- The LC Slicer is not intended for children and must not be used by children unattended by a responsible adult.
- The Slicer Blade is very sharp and can easily cause a cut or injury. To lift the blade, use the handle only.
- Keep the blade clean with no residues of polymer clay. When cleaning the Blade, pay special attention and never clean with bare hands or your fingers, use a cloth/wipe instead in a downward motion. Using a tong type tool to hold cloth /wipe is recommended.
- Always follow the safety instructions for the protection of yourself and of the others.
- LC Tools r.ro. is not responsible for any injuries or damages resulting from inappropriate handling of LC Slicer.
Troubleshooting
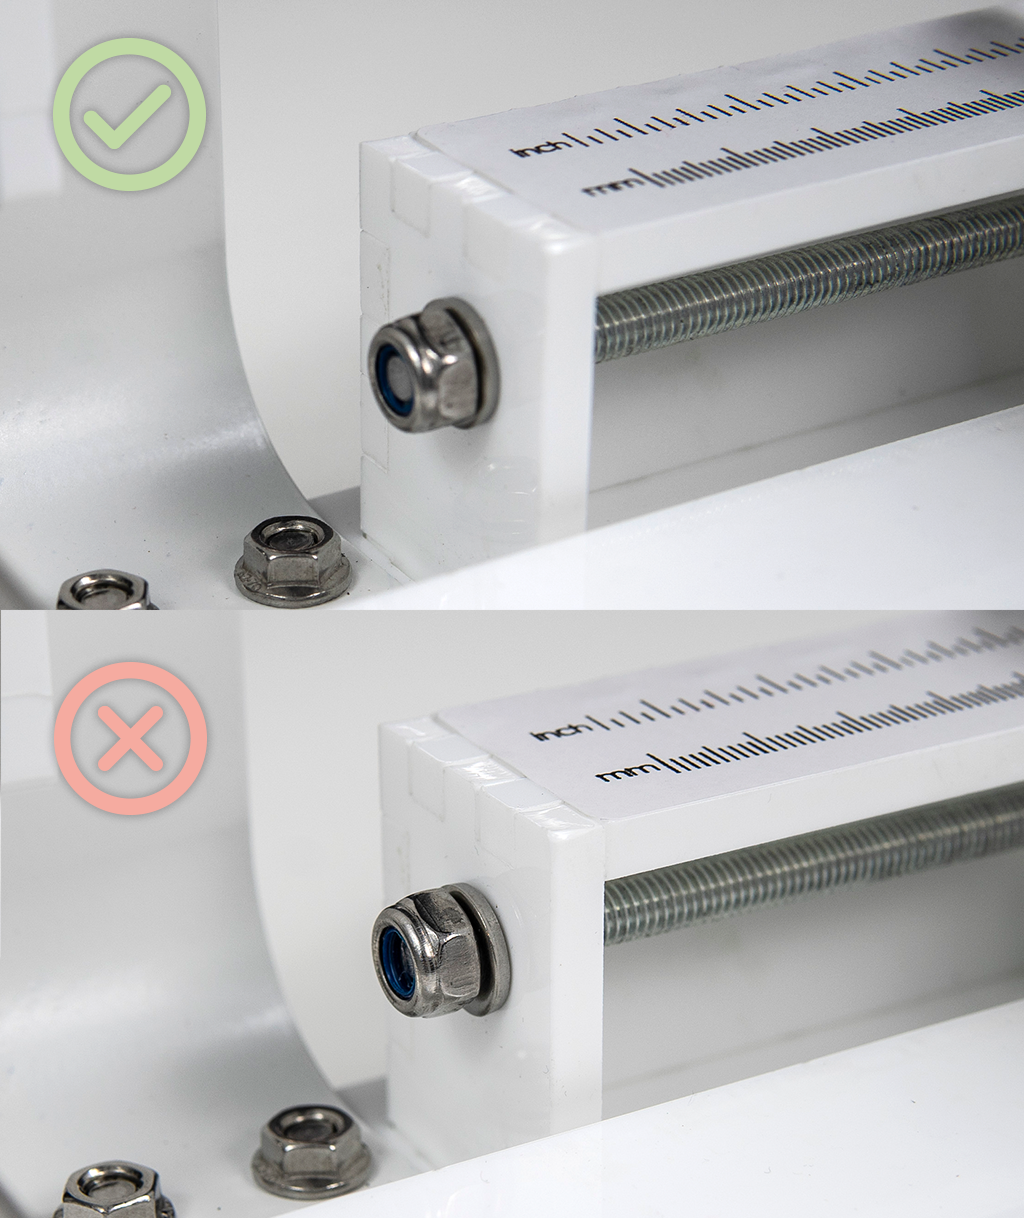
The correct position of the Backstop Support is inside of the EASE module.
The threaded rod should be practically free of any play, but it has to spin easily. Use the supplied key.
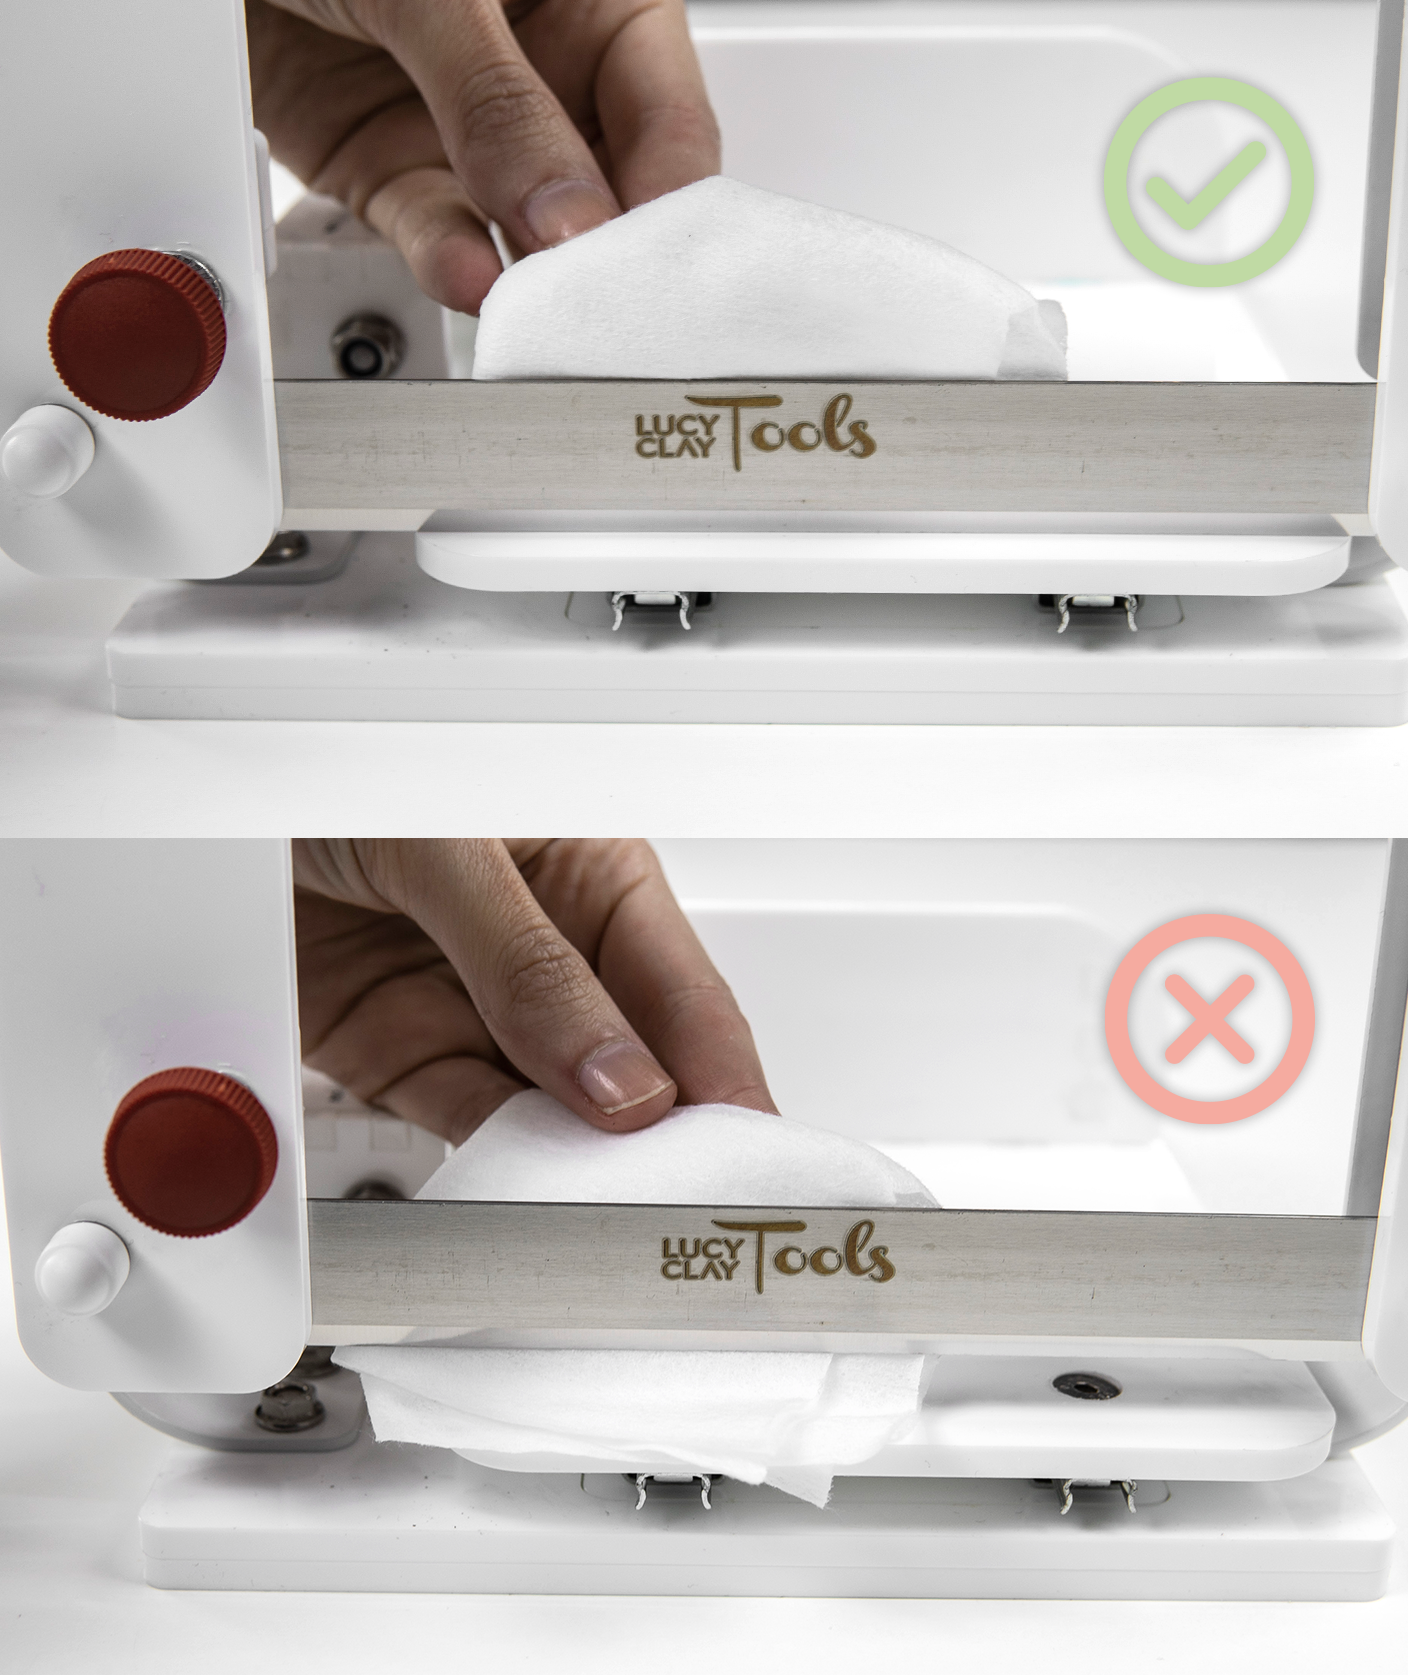 Never put your hand under the edge of the blade. Clean the blade in the lower position. Never clean the blade in any other way.
DOWNLOAD PDF:
Assembly Instructions for LC Slicer
Leave A Reply