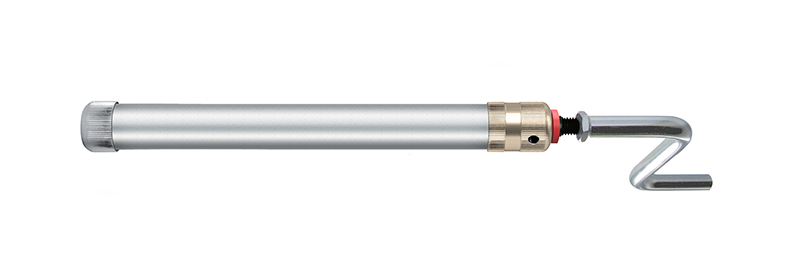
CZEXTRUDER HD
Czextruder is a robust, metal, high-quality Czech product designed to be used by hand or with a cordless drill. (Max 180rpm). Designed for regular extrusion disks with a diameter of 18.6 mm.
Preparation:
Attach hand crank or hex piece extension for use with a cordless drill to the small threaded end of the Czextruder rod. Always use nut to tighten against the handle/ hex piece.
Use:
1. Unscrew bottom cap.
2. Unscrew upper cap and take it out together with the threaded rod.
3. Rewind the upper cap to the far end of the threaded rod.
4. Insert the cylinder with two O-rings into the barrel and push it about 0.5 cm inside.
5. Insert well-prepared clay into the barrel, insert an LC disk into the bottom cap. Screw the barrel onto the bottom cap.
6. Screw on the upper cap (with threaded rod). Czextruder is ready for use.
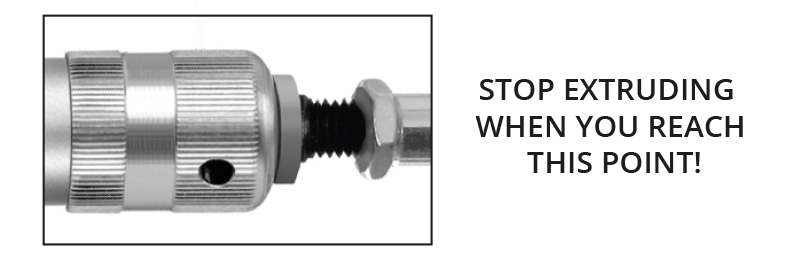
7. Extrude by hand or drill until the red Visual Helper touches the upper cap. You must stop extruding at this point to prevent the mechanism from becoming stuck.
8. Unscrew the bottom cap, turn the handle or drill to push out the white cylinder with two O-rings. Remove the cylinder from the barrel and clean.
9. Return to step 2 to begin again.
Follow these maintenance steps to keep your Czextruder in proper condition:
1. Do not tighten the Czextruder handle without inserting a disk and loaded with clay, as you could damage the threads or the cylinder with O-rings.
2. Clean the cylinder/O-ring/tube after each use from clay residue.
3. Occasionally remove O rings from cylinder and clean clay residue.
4. When you are finished with the Czextruder take out cylinder and clean it thoroughly.
5. Use LC Lubricant for threaded rod and caps to reduce friction.
6. Loosen caps for storage.
Technical parameters:
Length XXL 20 cm
Designed for regular disk with a diameter of 18,6 mm.
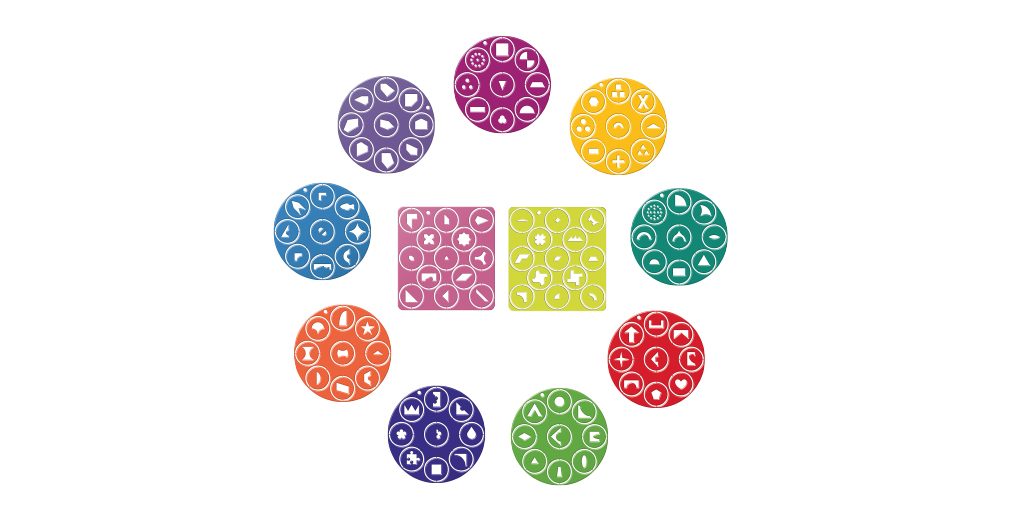
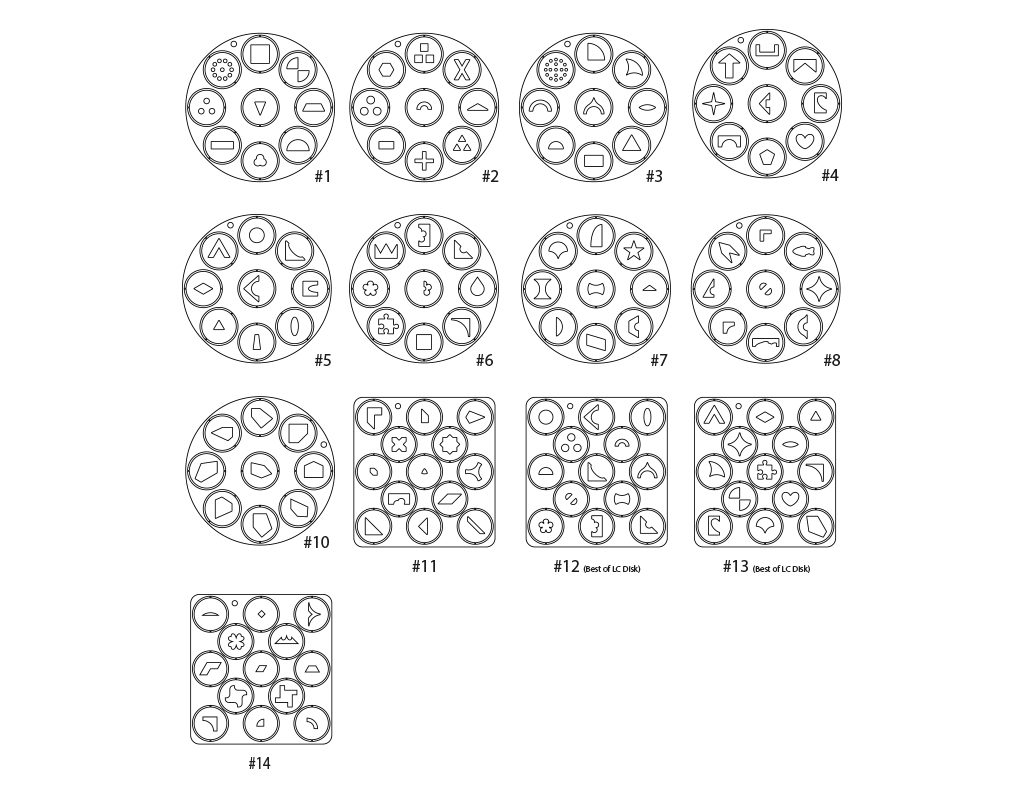
LC Disks
LC Disks (Lucy Clay® Tools) is an accessory for polymer clay designed not only for CZEXTRUDER. It comes in compact mini CD size (8 cm) or in a rectangular shape (8 x 8.5 cm). There are 107 different patterns prepared for you and more to come.
Features of LC Disks:
• A wide range of profiles, which is constantly expanding.
• Some profiles are specifically designed for mutual pairing.
• It’s made of stainless steel for a long service life.
Preparation and use of mini disks:
- Remove small disk with a pattern from disk container (mini CD) by twisting. Clean the connection nubs with sandpaper or nail clippers.
- The mini disk is now ready for insertion into Czextruder.

Technical parameters:
Outer diameter: 18,6 mm
Material: stainless steel, color paint
Intended not only for CZEXTRUDER.

LC Vise – magnetic click system
A great supporting tool for work with CZEXTRUDER. Enjoy hands-free extruding.
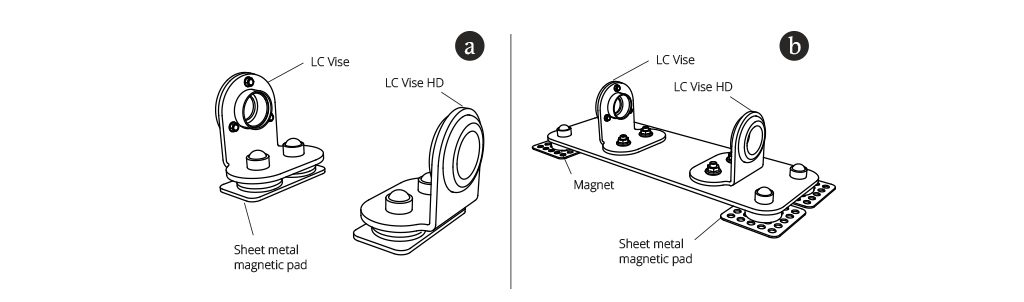
Preparation:
1. Place the double-sided tape on sheet metal magnet pads. Place sheet metal magnet pads on to round LC VISE magnets.
2. Put Czextruder barrel (without bottom cap) through the LC VISE HD and screw the Czextruder barrel into the LC VISE. Screw on Czextruder Upper Cap (with threaded rod and handle/hex piece at the LC HD VISE end.
3. Remove the release paper from the double-sided tape. Place your Czextruder on desired surface with the LC HD VISE positioned near Upper Cap end.
4. Slide sideways to remove Czextruder and LC VISE from metal magnetic pads. Metal magnetic pads will remain on chosen surface.
Use:
1. Unscrew the Czextruder from LC VISE and remove barrel.
2. Unscrew upper cap with threaded rod and remove.
3. Rewind the upper cap to the far end of threaded rod.
4. Insert the cylinder with two O-rings into the barrel and push it about 0.5 cm inside.
5. Insert well-prepared clay into the barrel, insert an LC Disk into the LC VISE. Insert barrel through HD VISE and screw into the LC VISE with inserted disk.
6. Screw on the upper cap (with threaded rod). Czextruder is ready for use.
7. Extrude by hand or drill until the red Visual Helper touches the upper cap. You must stop extruding at this point to prevent the mechanism from becoming stuck.
8. Unscrew the bottom cap, turn the handle or drill to push out the white cylinder with two O-rings. Remove the cylinder from the barrel and clean.
9. Return to step 2 to begin again.
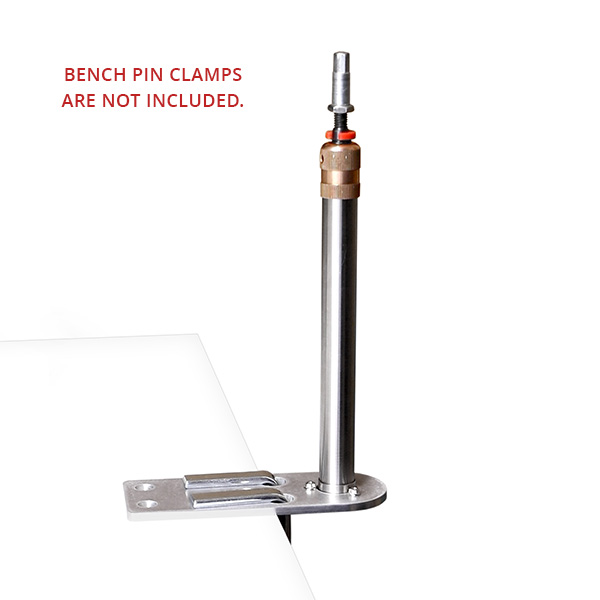
LC Verti-Vise
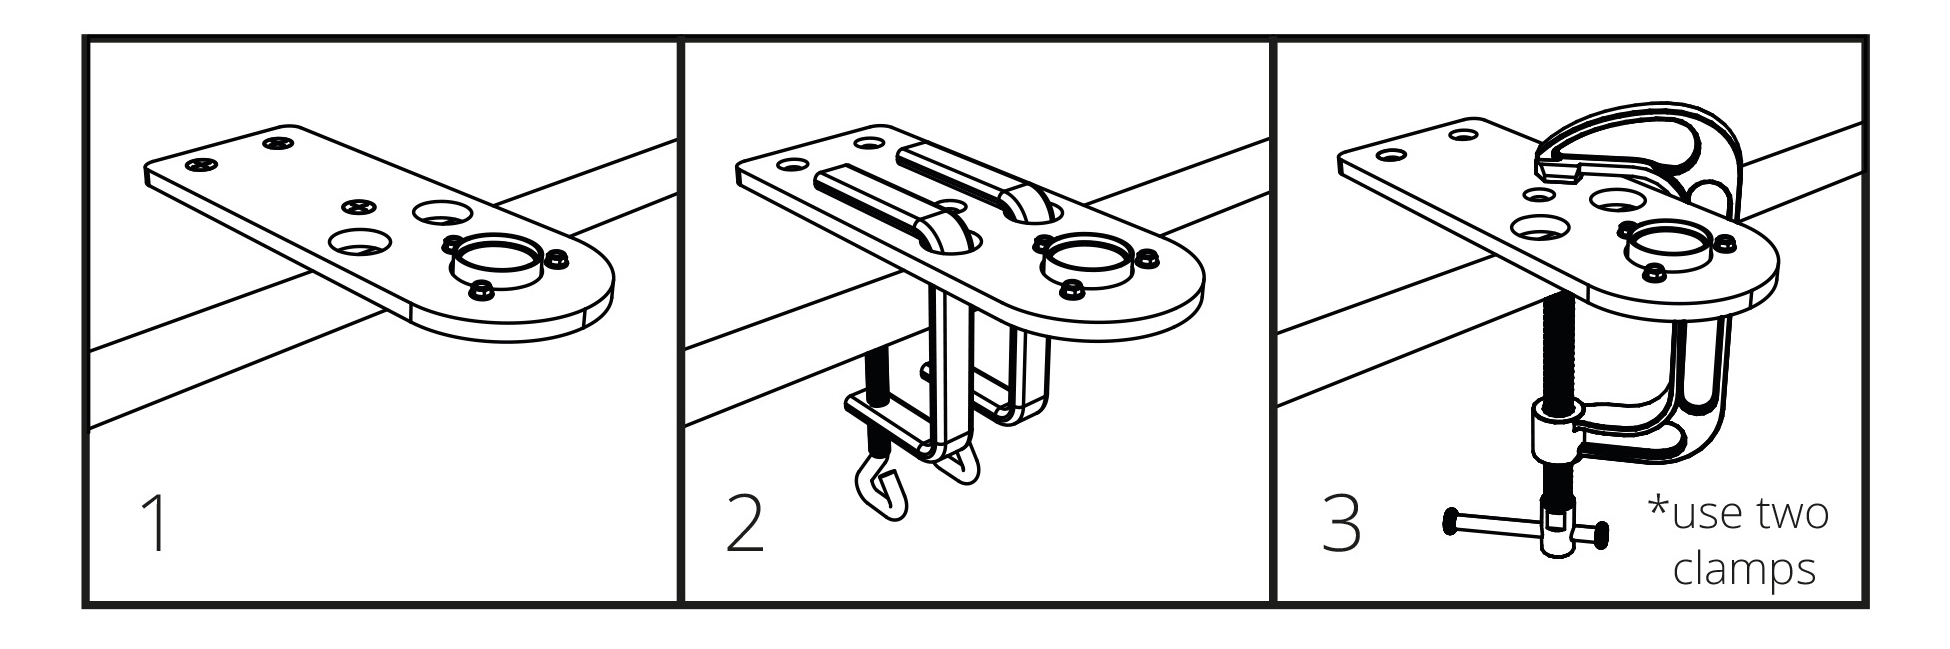
HOW TO ATTACH LC VERTI-VISE TO YOUR TABLE:
Option 1: The strongest option with a permanent attachment to the table or workbench with three screws (screws not included – visit your nearest hardware store).
Option 2: Two Bench Pin Clamps (not included – available in Jewellery Making Supplies – order online).
Option 3: Two standard hardware “C” clamps (not included – visit your nearest hardware store).
USE WITH CZEXTRUDER:
1. Unscrew the upper cap with the threaded rod from Czextruder (barrel).
2. Rewind the upper cap to the far end of the threaded rod.
3. Insert the cylinder with two O-rings into the barrel and push it about 0.5 cm inside.
4. Insert well-prepared clay into the barrel, then insert an LC Disk into the LC Verti-Vise. Screw the barrel (without the bottom cap) into the LC VISE.
6. Screw on the upper cap (with threaded rod). Check that the nut is tightened against the drill adapter (hex piece). Czextruder is ready for use.
7. Extrude by drill until the red Visual Helper touches the upper cap. You must stop extruding at this point to prevent the mechanism from becoming stuck.
8. Unscrew the Czextruder from the Verti-Vise. Use the drill to push out the white cylinder with two O-rings. Remove the cylinder from the barrel and clean it.
9. Return to step 1 to begin again.
USE WITH EXTRUDERS OF OTHER BRANDS:
Different lengths of extruder threads can cause leaks of clay into the LC Verti-Vise. Clean threads regularly. To avoid leaking, you can insert two discs into the LC Verti-Vise to fill the space.
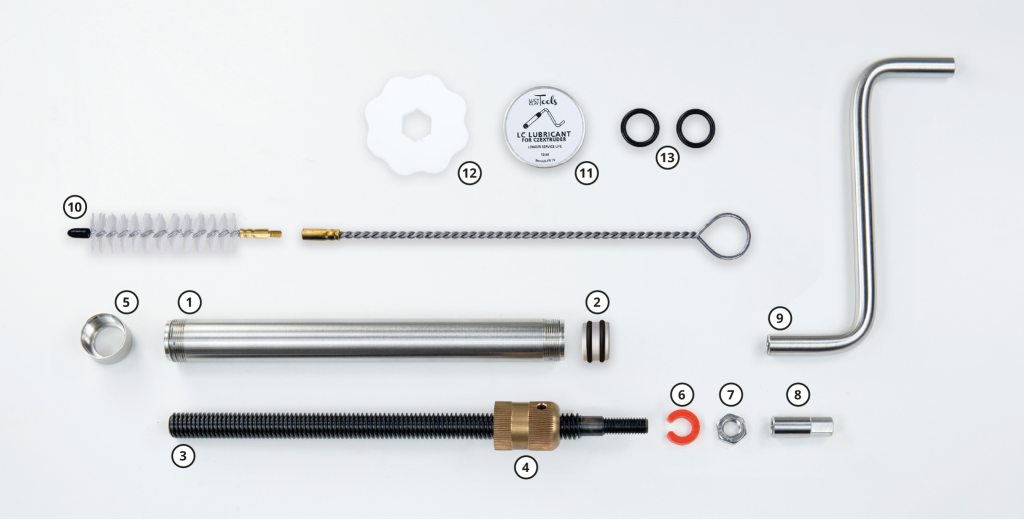
THE PARTS OF THE CZEXTRUDER:
1. Czextruder barrel / tube
2. Cylinder with o-rings
3. Threaded rod
4. Upper cap / threaded rod cap
5. Lower / bottom cap (here you insert LC Disk)
6. Visual Helper for Czextruder (works as a stop guide)
7. Release nut / jam nut
8. Drill adapter / hex piece
9. Handle
Czextuder is supplied with these accessories:
10. LC Brush for easy cleaning
11. LC Lubricant for easier work with Czextruder
12. Spanner / wrench for release nut
13. Two spare O-rings
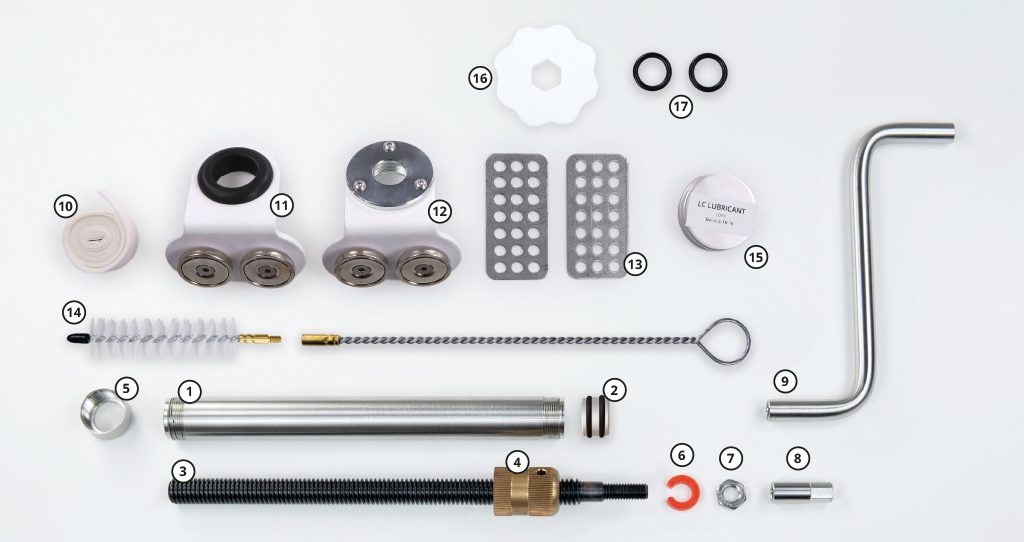
THE PARTS OF THE CZEXTRUDER SET:
1. Czextruder barrel / tube
2. Cylinder with o-rings
3. Threaded rod
4. Upper cap / threaded rod cap
5. Lower / bottom cap (here you insert LC Disk)
6. Visual Helper for Czextruder (works as a stop guide)
7. Release nut / jam nut
8. Drill adapter / hex piece
9. Handle
10. Double-sided tape
11. Vise HD (upper vise)
12. Vise (lower vise)
13. Two sheet metal magnetic pads
Czextuder is supplied with these accessories:
14. LC Brush for easy cleaning
15. LC Lubricant for easier work with Czextruder
16. Spanner / wrench for release nut
17. Two spare O-rings
3D printed spare parts
A spare cylinder for O-rings can be made using a 3D printer. We recommend utilizing a 100% fill for optimal durability. Then, select appropriately sized O-rings from your local hardware store.
Download stp file and technical drawing (pdf)
Czextruder Manual
Lucy Clay Tools guide
www.lucyclay.com/tools
2 Comments
I just received my Czextruder HD stainless steel Xxl today and though I used the “visual stop” as instructed, the extruder is already locked and I am unable to remove either end from the cylinder. This is not acceptable for $89.00 plus shipping. This product defect is mentioned repeatedly in your own literature and in reviews, but I am unable to find a solution for unlocking anywhere. Please advise. Thanks
Dear Susannah, thank you for your comment! We are very sorry to hear that 🙁 Please contact our technical support team at support@lucyclay.com , it would be great if you added some photos too. Thank you for your understanding and we hope you will enjoy work with your Czextruder soon.